
Release notes for the Genode OS Framework 18.11
Our road map for 2018 emphasized software quality and resilience as one of the major topics of the year. The release 18.11 pays tribute to this plan on multiple levels.
First, by integrating static code analysis into Genode's build and packaging tools, we aim to cultivate rigid code analysis as a regular part of our work flows to catch bugs as early as possible - before running any code (Section Static code analysis).
The second line of defense are intensive automated tests, which are steadily extended. The tests can roughly be classified into unit tests, component tests, and integration tests. By moving over 70 component tests from individual test scenarios (run scripts) to Genode packages, we became able to run all these tests as one big integration test. As described in Section Automated test infrastructure hosted on top of Genode, the large batch of component tests, their orchestration, and the analysis of the results are performed directly on the target platform. This approach not only stresses the resilience of the base framework and the underlying kernels, but it also makes each individual test easily reproducible, e.g., on top of Sculpt OS.
For unit tests, coverage metrics are a useful tool to aid the test development. The current release integrates the support of the gcov tool into the build system and test infrastructure so that these metrics become easy to obtain.
To improve the resilience of Genode systems that contain parts that are known/expected to sometimes fail, e.g., because they depend on hugely complex software stacks, the new release features the ability to monitor the health of components (Section Component health monitoring). Using this new introspection mechanism, Genode systems become able to respond to such conditions by restarting the affected component or by logging the event.
The most sophisticated integration test is certainly the interactive use of Sculpt OS on a daily basis. On that account, we are happy to introduce a few new toys to play with. By introducing a new window layouter and modularizing Sculpt's window-management packages, window decorators can now be swapped out at runtime, window layouts are preserved across reboots, and the layout rules can be edited on the fly (Section Enhanced window-management flexibility).
Also outlined on our road map, we strive to apply Genode for network appliances and typical server applications. With the new ability to host MirageOS unikernels directly on Genode (Section Genode as a platform for Mirage-OS unikernels), MirageOS-based server applications can be readily integrated into Genode systems. Another key component for server use cases is the new SSH server described in Section SSH terminal server, which allows for the friction-less remote administration of Genode-based servers.
Further highlights of the current release are the improved network performance on Xilinx Zynq, the initial version of a Genode SDK, performance improvements of the base-hw kernel on NXP i.MX platforms, and the updated language support for Ada and Java.
Raising the bar of quality assurance
Automated test infrastructure hosted on top of Genode
When it comes to testing, Genode's run tool provides a convenient way for building, configuring, executing, and evaluating system scenarios. Throughout the years, the base framework became equipped with a broad variety of run scripts, each dedicated to another aspect of Genode. Most of them support being integrated into a fully automated test infrastructure. For instance, all the tests listed in tool/autopilot.list are automatically evaluated each night at Genode Labs for different platforms and kernels. This exposes the current state of development to a variety of base-system behavior (e.g., scheduling) and quickly reveals regression bugs.
|
However, the existing approach had its drawbacks:
-
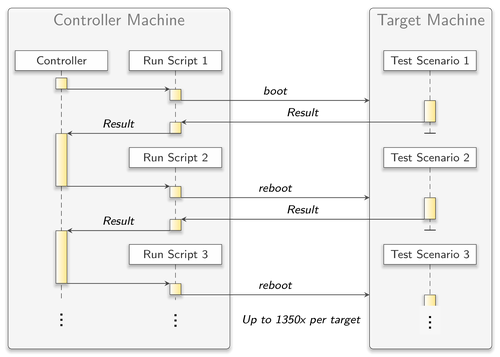
As each test was realized through a run script executed individually, the target platform had to be booted over and over again. So, for larger lists of tests like tool/autopilot.list, boot times could sum up to a significant magnitude. Moreover, continuous on and off switching of hardware may have a negative effect on its lifetime.
-
Most of the mentioned run scripts neither needed more than a few minutes to finish nor did they include a lot of dynamics regarding, for instance, the creation and destruction of components. So the software system as a whole was stressed only to a very limited extent.
-
The description of the test scenarios could not be used for running tests from within an on-target Genode natively. But especially in the context of the ever growing use of the Sculpt desktop system, this becomes more and more desirable. The run script mechanism, however, is designed for a Linux-based host platform remote-controlling the target.
This brought us to the idea of creating a new component that takes sets of tests that are described through Genode means only as input. It evaluates one after the other in a sandbox environment to, eventually, provide the user with an easy-to-read result list. When it came to choosing the test-description format, the already existing depot mechanism - as used within Sculpt OS - was an obvious candidate.
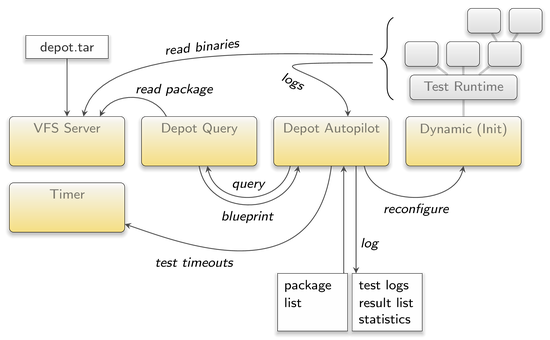
Depot packages are designed to describe dynamically loadable sub trees for Genode's component hierarchy, i.e., exactly for what a test scenario should be in the context of the new component (plus some extra information about platform requirements and success conditions). Furthermore for managing package depots, Genode already provides a comprehensive set of well-tested tools, most noteworthy in this context the depot-query application. This component makes querying the contents of packages as easy as writing the package path to a report and awaiting the resulting blueprint through a ROM dataspace. That said, the choice of the back-end mechanism was clear and consequently, we named the new component depot autopilot.
The depot autopilot
As starting point for the development of the depot autopilot, the depot deploy component (introduced with the 17.08 release), served us well. Both components have the purpose of loading Genode scenarios from packages and start them inside a nicely separated instance of Genode's init runtime. For this reason, a good part of the depot autopilot configuration interface might look familiar to you, as shall be depicted by this example:
 <config arch="x86_64" children_label_prefix="this is new">

   <static>
     <parent-provides>
       <service name="ROM"/>
       <service name="CPU"/>
       ...
     </parent-provides>
   </static>

   <common_routes>
     <service name="ROM" label_last="init"> <parent/> </service>
     <service name="CPU">                   <parent/> </service>
     ...
   </common_routes>

   <start name="test-mmio"     pkg="genodelabs/pkg/test-mmio/2018-10-30"/>
   <start name="test-xml_node" pkg="genodelabs/pkg/test-xml_node/2018-10-30"/>
   ...

   <previous-results ...> <!-- this is new --> </previous-results>

 </config>
Like in depot deploy configurations, there are <start> nodes to declare, which scenarios to run and from which packages to load them, there is an arch attribute to select the packages architecture variant, and also the <static> and <route> nodes that install common parts of the configuration. The same goes for the runtime files in the test packages. They are actually fully compatible with the depot deploy tool:
 <runtime ram="32M" caps="1000" binary="init">

   <requires> <timer/> <nic/> </requires>

   <content>
     <rom label="ld.lib.so"/>
     <rom label="test-example"/>
   </content>

   <config>
     <parent-provides> ... </parent-provides>
     <default-route>   ... </default-route>
     <start name="test-example" caps="500">
       <resource name="RAM" quantum="10M"/>
     </start>
   </config>

   <events> <!-- this is new --> </events>

 </runtime>
But there are also new things as you can see. We will explain them below.
Roughly outlined, the concepts of the depot autopilot differs in three points from that of the depot deploy component:
-
The outcome of loaded scenarios is captured and interpreted in order to support failure detection and analysis,
-
Scenarios do not run in parallel but in a given order to mitigate interfering influences and make results reproducible, and
-
Scenarios must be considered to trigger bugs that may lead to situations where the scenario itself or even the whole system hangs or crashes.
The first point is addressed by the new <events> tag in runtime files. It allows for listing events that might trigger during a test and specify the reaction of the depot autopilot. Currently, two types of events, the <log> event and the <timeout> event, are available, which cover most of the use cases found in tests of the Genode main repositories. Here's a short example of how to use them:
 <runtime>
   <events>
     <timeout meaning="failed" sec="20"/>
     <log meaning="succeeded">[init -> test-example] Test succeeded!</log>
     <log meaning="failed">Error: </log>
   </events>
   ...
 </runtime>
The content of each <log> node is matched continuously against the output of each LOG client of a test. The first tag whose content matches completely decides on the tests result through its meaning attribute and causes the depot autopilot to replace the current test scenario with its successor. In order to be able to do the matching, the depot autopilot acts as LOG session server to all components of a test scenario, given that incoming LOG session requests can be correlated to these components. This behavior leads to the requirement that the depot autopilot receives the session-label prefix of the runtime init through the new children_label_prefix attribute of its configuration:
<config ... children_label_prefix="test_init_runtime -> ">
As soon as the <log> event matching is done, the test output is incorporated into the autopilot's LOG output, so, later debugging may benefit from it as well.
A <timeout> node, on the other hand, causes the autopilot to set a timeout according to the sec attribute when starting the test. Should the timeout trigger before the test terminated in another way, it's up to the <timeout> node to define the test's result and terminate the test.
The second point, regarding the scheduling of tests, is an easy one. While for the depot deploy tool, the order of <start> nodes is irrelevant, for the depot autopilot, it defines the order in which tests shall be executed.
The last point raised the question of what to do when a test gets stuck or, even worse, compromises the whole system. The former is already handled by using the above mentioned <timeout> events. The latter, on the other hand, brings the <previous-results> node of the autopilot configuration into play. With this node, the depot autopilot instance can be equipped with the results of a previously running instance. This way, the target platform can be rebooted when a system crash is detected and can proceed with the remaining tests without losing the information gathered during earlier boot cycles. This is a short example:
 <config>
   <previous-results time_sec="15"
                     failed="1"
                     succeeded="1"

   > test-1  ok       0.563  log "Succeeded"
  test-2  failed  20.000  reboot</previous-results>
   ...
 </config>
The so configured depot-autopilot instance will put the content string of the <previous-results> node at the top of its result list. The values of the attributes of the tag (succeeded, failed, ...), at the other hand, are relevant for result statistics.
Once all tests are evaluated, the depot autopilot outputs a result overview comprising a list of single test results and some statistical data:
 --- Finished after 1207.154 sec ---

   test-init       failed   300.015  timeout 300 sec
   test-init_loop  ok        57.228  log "child "test-init_loop" exited wi ..."
   test-ldso       ok         1.779  log "[init -> test-ldso] Lib_2_global ..."

 succeeded: 2 failed: 1 skipped: 0
For a comprehensive description of all the features of the depot autopilot, please have a look at repos/gems/src/app/depot_autopilot/README.
The run script
With the depot autopilot component, testing becomes more independent from a non-Genode host system that executes run scripts. However, we did not intend to port all existing tests at once nor do we know yet if this is desirable. In our nightly testing infrastructure, tasks like powering on and off the target platform or managing the log archives are still bound to Linux and the time-tested run mechanism. Thus, a mediation between the depot autopilot and the existing test infrastructure is required.
|
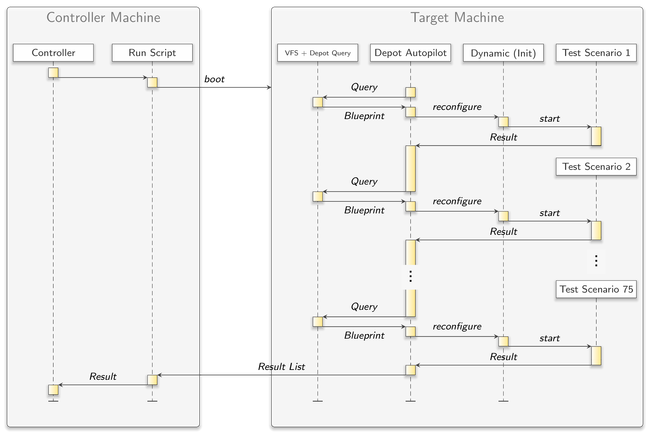
The solution is the new run script gems/run/depot_autopilot.run. This run script contains a scenario that combines a TAR VFS, a depot query component, the depot autopilot, and an init runtime resulting in a fully automated meta test-unit for the run mechanism. Inside the script, you have a convenient and small set of configuration variables. Normally, you just list the names of the test packages to evaluate and define platform incompatibilities through optional skip_test_pkg variables:
 set avail_test_pkgs {
   test-lx_block
   test-log
   test-tcp_bulk_lwip
   test-mmio
   ... }

 set skip_test_pkg(test-lx_block)      [expr ![have_spec linux]]
 set skip_test_pkg(test-tcp_bulk_lwip) [expr ![have_spec x86]]
Together with the --depot-user run parameter, the run script composes an archive of a depot directory containing the correct versions of all needed packages. As usual, the run modules manage the boot process of the target platform and the loading of the system image, thereby shipping the depot archive as Genode boot module. The archive can then be accessed by the depot query tool on target through the VFS server. The depot autopilot, on the other hand, gets configured to successively request the exact same packages from the depot query tool and evaluates them using the init runtime named "dynamic".
|
The run script can also handle system crashes. Through the depot autopilot's log output, it keeps track of every test started and its individual timeout. If a timeout goes by without the depot autopilot having terminated the current test, the run script intervenes. As it also records the individual test results printed by the depot autopilot up to this point, it can now reboot the system to continue testing. In this follow-up attempt, everything remains the same with two exceptions. First, the list of tests is pruned by the already evaluated tests plus the test that caused the reboot, and second, the <previous-results> node of the depot autopilot is used to pass on the findings of former attempts. This way, the final result list of the depot autopilot should always be reached and always be complete.
Another feature of the run script is that it offers an alternate mode for debugging a single test without having to switch the scenario. Through three variables you can deactivate all but one test and apply source code changes without having to rebuild packages. For example:
 set single_test_pkg "test-libc_vfs"
 set single_test_build { server/ram_fs test/libc_vfs }
 set single_test_modules { ram_fs vfs.lib.so }
This would only run the libc_vfs test and overlays the package contents with the ram_fs and vfs.lib.so images, which are freshly built from the local source repository.
A more detailed documentation of the run script can be found at repos/gems/src/app/depot_autopilot/README and inside the run script itself.
The test packages
Of course, the depot autopilot isn't worth much without any test packages in place and all of our tests existed solely in the format expected by the run tool. But we had the feeling that a significant amount of them should be portable without great difficulty. One potential limiting factor was that drivers should not be an individual part of test runtimes as, so far, restarting drivers causes problems in most cases. Therefore, they must be loaded by the surrounding system. However, holding drivers for all hardware available just in case that a test needs them would unnecessarily raise the scenario's complexity and disturb less demanding but more performance critical tests. Thus, we decided to let the depot-autopilot run script provide merely the timer driver as most of the component and unit tests are satisfied with this. As soon as we want to port tests using other drivers, like the network-bench suite, a dedicated depot-autopilot run script would be the way to go. Another noteworthy point is the rather basic feature set for doing result evaluation with the depot autopilot. As it turned out, most tests comply with this limitation because tricky success conditions aren't encouraged by the run mechanism either.
All in all, we managed to port 75 tests from the repositories base, os, libports, and ports to the depot autopilot during this release cycle. To avoid redundancy, we removed the corresponding run scripts at the same time. Each package that represents a test is prefixed with "test-" so you can quickly receive an overview of all available tests by doing:
find <GENODE_DIR>/repos -type d -wholename *recipes/pkg/test-*
New tooling for obtaining test-coverage metrics
The gcov tool can analyze how often each source-code line of a test program has been executed.
On POSIX-like systems the usual steps to use this tool are as follows:
-
When building a test program, special compiler flags add instrumentation code to the program and generate a gcov "note" file along with each object file. These note files are needed later on for the final analysis. The test program is also linked against the gcov library.
-
When the test program is running, it collects coverage data and writes it into a gcov "data" file for each object file when the program exits.
-
The gcov program uses the source, note, and data files to generate annotated source-code files with the number of times each line has been executed.
We ported the gcov tool to Genode to use it with our native (non-libc) Genode tests and the depot_autopilot run script. It is integrated in the following way:
-
When adding COVERAGE = yes to a target.mk file of a test program, the build system adds the gcov-specific compiler flags and links the program with the gcov library.
-
The generated gcov note files get a symlink in the build/.../bin/gcov_data directory, which is added to the binary depot package of the test program. This way, the note files become available within the binary archives of the depot as used by the "depot_autopilot" system scenario described in Section Automated test infrastructure hosted on top of Genode.
-
When the test program starts, it calls env.exec_static_constructors(). Each instrumented object file registers itself at the gcov library from a static constructor (auto-generated with the gcov compiler flags).
-
The gcov library needs the Genode environment to write the collected data to a file system, so the test program also calls the gcov_init() function with a reference to the environment.
-
When the test program has finished, it calls genode_exit(), which in turn calls an exit handler registered by the gcov library. The gcov library then writes the coverage data files to a RAM file system with a path that matches the path to the note files in the depot in the same file system.
-
When all tests have finished, the depot_autopilot scenario runs the gcov program, which scans the file system for the collected gcov data files and writes the final analysis for each file to the log. If the name of the test package is included in the avail_test_src_pkgs list of the depot_autopilot.run script, the source and API archives of the test are added to the depot and the source code is printed together with the counts and line numbers, otherwise only the counts and line numbers with the text /*EOF*/ on each line are printed.
So far, we enabled the code coverage analysis feature for the xml_generator test and it can be seen in action by running the depot_autopilot.run script.
Static code analysis
The static analyzer tool of https://clang-analyzer.llvm.org can analyze source code in C and C++ projects to find bugs at compile time.
With this tool enabled, Genode users can check and ensure the quality of Genode components. The tool can be invoked during make invocations and during the creation of Genode packages.
For the invocation of make within a Genode build directory, the new STATIC_ANALYZE variable on the command line will prompt the static analyzer to run next to the actual build step.
STATIC_ANALYZE=1 make -C build/x86_64 KERNEL=... run/...
For analyzing Genode packages, a new wrapper tool tool/depot/static_analyze becomes handy. It can be combined with the existing tool/depot/* tools to take effect, e.g.:
tool/depot/static_analyze tool/depot/create <user>/pkg/...
The results of the static-analyzer tool are generated in the form of html pages and can be inspected afterwards. The following example output showcases a run of the static analyzer tool:
 make: Entering directory '../genode/build/x86_64'
 checking library dependencies...
 scan-build: Using '/usr/lib/llvm-6.0/bin/clang' for static analysis
 ...

 LINK     init
 scan-build: 0 bugs found.
 scan-build: The analyzer encountered problems on some source files.
 scan-build: Preprocessed versions of these sources were deposited in
             '/tmp/scan-build-2018-11-28-111203-20081-1/failures'.
During our enablement of this feature we used Clang 6.0 on Ubuntu 16.04. The steps to provide the required tools on Linux are like follows.
 sudo apt install clang-tools-6.0
 cd $HOME/bin
 ln -s $(which scan-build-6.0) scan-build
Genode as a platform for Mirage-OS unikernels
This year, we collaborated with MirageOS at Bornhack and the MirageOS hack retreat in Marrakesh to bring unikernel applications to Genode as native components. MirageOS is an application framework that provides all necessary OS abstractions for network applications as a library. A MirageOS unikernel requires a machine operating system to provide a thread of execution, system time, a network interface, and block storage. Higher-level OS facilities such as multitasking, TCP/IP, and object storage are implemented as statically linked libraries written in the same language as the application, OCaml in the case of MirageOS. Relative to traditional applications that rely on a POSIX runtime this allows for significant code pruning at compile-time and simple and precise host environment requirements.
MirageOS was originally implemented with Xen as the machine OS but to port MirageOS to other hypervisors a general sandboxing middleware library was created. This library is Solo5, which provides the simple abstractions necessary for running a unikernel as paravirtualized guest or as sandboxed process of another OS. After investigating both approaches, we chose to implement a native Solo5 bindings library. This follows our belief that an operating system can provide process isolation equal to and more efficiently than hardware assisted virtualization. We share this belief with the unikernel community and expect it as an inevitable trend in hosted computing. Furthermore, the burden of developing and maintaining a unikernel support layer is trivial compared to a virtual machine monitor.
Building and deploying MirageOS with Genode requires coordination at both sides. For this reason, Genode target support was added to the Mirage tooling in the 3.3.0 release. The Genode platform layer of Solo5 and Mirage differs most from other targets such as Muen in that it is dynamically linked. This allows a Mirage image to remain viable across Genode API and ABI changes.
To compile Mirage code into a Genode compatible binary, one may follow the standard build procedure using the mirage tool just as one would for Muen or Unix.
 # See https://mirage.io/docs/ for instructions
 # on building a MirageOS application.

 cd mirage-skeleton/tutorial/hello/
 mirage configure --target genode --dhcp=true
 make depends
 make build
The output is a Genode program dynamically linked to a Solo5 bindings library. This library is built using the Genode tool chain and is available as a depot package. Finding a smooth workflow for deploying unikernels with Genode is a topic open for discussion, but for now, we offer a run scenario for creating a standalone x86_64 MirageOS boot image with an ethernet driver.
 # See https://genode.org/documentation/developer-resources/build_system
 # for instructions on preparing the Genode build system.

 cp mirage-skeleton/tutorial/hello/hello.genode \
    genode/build/x86_64/bin/mirage
 cd genode/build/x86_64

 # Build and run a minimal image (serial logging only):
 make run/mirage_net KERNEL=hw

 # Build and run an image with a graphical console:
 make run/mirage_pretty KERNEL=hw

 # To prepare a USB image for booting real hardware:
 sudo cp var/run/mirage_pretty.iso «your USB stick device file»
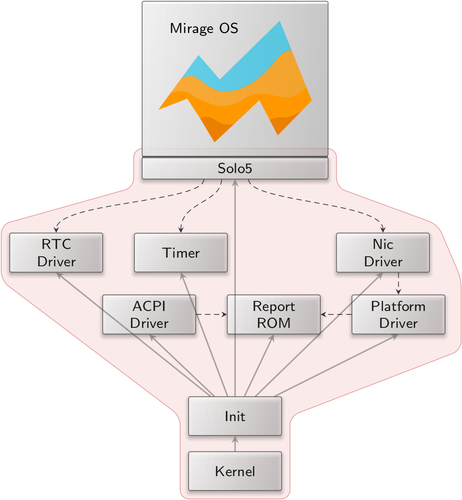
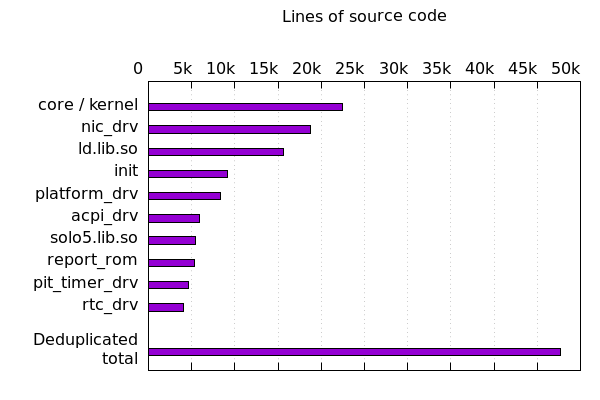
For a minimal network scenario, a Mirage instance requires only a handful of components, time sources, a network driver, and an I/O hardware-access multiplexer.
|
|
A minimum viable Genode system for hosting Mirage, the trusted computing base is highlighted in red
|
A simple demo not withstanding, we can justify Genode as a unikernel hosting platform by analyzing the complexity of a Genode host system by measuring the lines of C++ code used to produce such an image. This yields an initial metric for assessing the security of a system as well as its cost to develop and maintain. By compiling each component with debugging symbols, parsing binaries for file paths injected by the compiler, and collecting a sum of the number of lines found in each file, we get an estimate of the total line count for each component. Building a set of every source file used in the minimal system, excluding the unikernel itself, the sum of lines of code does not exceed 50,000. We assert that this is a fraction of the size of any Unix-derived hosting environment.
|
Base framework and OS-level infrastructure
Component health monitoring
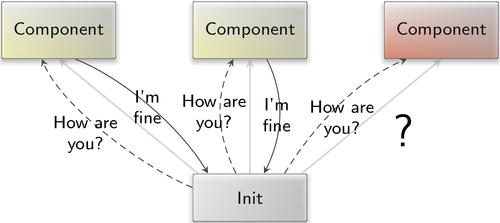
Scenarios where components are known to sometimes fail call for a mechanism that continuously checks the health of components and reports anomalies. To accommodate such use cases, we introduced a low-level health-monitoring mechanism into the foundation of the framework and made this mechanism available via init's configuration concept.
At the lowest level, the parent interface received two new RPC functions. The heartbeat_sigh function allows a child to register a signal handler for heartbeat signals. The heartbeat_response function allows a child to confirm its health to the parent. With this basic interface, a parent becomes able to periodically ask for a life sign from each of its children.
|
Each component installs a heartbeat signal handler during its initialization. This happens under the hood and is thereby transparent to application code. The default heartbeat handler invokes the heartbeat_response function at the parent interface and thereby confirms that the component is still able to respond to external events.
With this low-level mechanism in place, we enhanced the init component with the ability to monitor components hosted on top of init. A global (for this init instance) heartbeat rate can be configured via a <heartbeat rate_ms="1000"/> node at the top level of init's configuration. The heartbeat rate can be specified in milliseconds. If configured, init uses a dedicated timer session for performing health checks periodically. Each component that hosts a <heartbeat> node inside its <start> node is monitored. In each period, init requests heartbeat responses from all monitored children and maintains a count of outstanding heartbeats for each component. The counter is incremented in each period and reset whenever the child responds to init's heartbeat request. Whenever the number of outstanding heartbeats of a child becomes higher than 1, the child may be in trouble. Init reports this information in its state report via the new attribute skipped_heartbeats="N" where N denotes the number of periods since the child became unresponsive.
Of course, the mechanism won't deliver 100% accuracy. There may be situations like long-running calculations where long times of unresponsiveness are expected from a healthy component. Vice versa, in a multi-threaded application, the crash of a secondary thread may go undetected if the primary (checked) thread stays responsive. However, in the majority of cases where a component crashes (page fault, stack overflow), gets stuck in a busy loop, produces a deadlock, or throws an unhandled exception (abort), the mechanism nicely reflects the troublesome situation to the outside.
Enhanced window-management flexibility
Genode's custom GUI architecture consists of multiple components with strictly distinguished roles. The central broker between those components is a low-complexity window-manager (wm) component, which is complemented by a so-called decorator that defines how windows look, and a layouter that defines how they behave. Since the layouter and decorator are sandboxed components without access to the application window's content nor the user input into the applications, those components are largely uncritical for the information security of GUI applications.
New window layouter
The window layouter complements the window manager with the policy of how windows are positioned on screen and how they behave when the user interacts with window elements like the maximize button or the window title. The current release replaces the former "floating_window_layouter" with a new "window_layouter" component that supports the subdivision of screen space into columns and rows, the concept of layers, and the principle ability to store window layout information across reboots.
Layout rules
The window layouter positions windows according to rules defined by the component's configuration. The rules consist of two parts, the definition of the screen's layout and the assignment of client windows to the defined parts of the screen's layout.
 <config>
   <rules>
     <screen>
       ...definition of screen layout...
     </screen>
     <assign label_prefix="..." target="..."/>
     ,,,
   </rules>
   ...
 </config>
The <screen> node can host any number of <column> nodes, which partition the screen horizontally into columns. By default, each column has the same size. By specifying an optional weight attribute, column sizes can be weighted relative to one another. The default weight is 1. Alternatively, the width of a column can be explicitly specified in pixels. Each column can host any number of <row> nodes, which subdivide the column vertically. Analogously to columns, rows can be dimensioned via an optional weight attribute or an explicit height in pixels. A <row> can, in turn, contain <column> nodes, thereby further subdividing the screen. Each <column> or <row> can be used as window-placement target when equipped with a name attribute. Each name must occur only once within the <screen> node. In the following, a named column or row is referred to as target. Each target can host an optional layer attribute. If not specified, the layer 9999 is assumed. A target with a lower layer overlaps targets with higher layers.
The assignment of windows to targets is defined via <assign> nodes. Each <assign> node must be equipped with a label, label_prefix, or label_suffix attribute, which is used to match window labels. For a given window, the first matching <assign> node takes effect.
Each <assign> node must have a target attribute that refers to the name of a column or row. By default, the window is sized to fit the target area. However, it is possible to position the window relative to the target area by specifying the xpos, ypos, width, and height attributes together with the maximized="no" attribute.
If multiple windows are assigned to the same target area, the order of their <assign> rules defines their stacking order. The window with the earliest <assign> rule is displayed in front.
Dynamic layouts
The window layouter is able to respond to rule changes at runtime.
By specifying the <config> attribute rules="rom", the window layouter tries to obtain the layout rules from a distinct ROM module. Should the ROM module not contain valid rules, the <rules> sub node of the <config> comes into effect.
Any window-layout change such as the movement of a floating window is realized as a change of the window-layout rules. To support interactive adjustments of the window layout, the layouter responds to certain user interactions by generating new rules by itself in the form of a "rules" report. The generation of such rules can be enabled via the <report> sub node of the configuration:
 <config>
   <report rules="yes"/>
   ...
 </config>
By feeding back the rules generated by the window layouter into the window layouter itself via a report_rom service, the window layout becomes adjustable interactively. As the rules entail the complete state of the present window layout, it is possible to save/restore the layout state.
Dynamic rule-generation mechanism
Whenever a new window appears that solely matches a wildcard <assign> rule (one that uses a label_prefix or label_suffix), the layouter generates a new <assign> rule with the window's label as label attribute. The explicitly labeled <assign> rules appear before any wildcard <assign> rules.
If the user brings a window to front, the window layouter will change the order of the explicit <assign> rules such that the window's <assign> rule comes first. When moving or resizing a window, the xpos, ypos, width, and height attribute of the window's assign rule are updated. When maximizing or unmaximizing a window, the maximized attribute of its <assign> rule is toggled.
Modularized window system in Sculpt OS
Sculpt OS used to come with a package called "wm", which comprised a ready-to-use composition of window-system components, including the layouter, a decorator, and the configuration of these components. Even though this package was convenient for a start, we desire more flexibility. For example, a user may wish to replace the decorator at runtime or tweak the configuration of the individual components at runtime. For this reason, we split up the wm package. For the convenient use in run scripts, we preserved the former wm package as "motif_wm".
With the move of the window layouter and window decorators into dedicated packages, those components can now be combined with the "wm" server at runtime and restarted/reconfigured/swapped-out independently. To use the window manager in Sculpt, one must launch the "wm", "window_layouter", and one of the "motif_decorator" or "themed_decorator" packages. It is possible to replace one decorator by the other at runtime.
The window layouter package depends on a so-called "recall_fs" component, which is a file system used for remembering the window layouter's state. Sculpt comes with a ready-to-use "recall_fs" launcher, which hands out the directory /recall of the used file system. When the window layouter is started, a file /recall/window_layouter/rules reflects the current state of the layouter. It serves two purposes. First, it preserves the window layout across reboots. Second, it can be edited by the user or (potentially) by other components. Thereby, the layout policy can be tweaked without limits, and the rules can simply be swapped out by mere file operations.
Network-stack improvements
The transition from lwIP as a plugin to the libc library to a plugin to the VFS library is complete. As a result, POSIX applications can no longer be linked to lwIP through the libc_lwip library. Instead they need only to link with the libc library and be configured at runtime to open network connections through the local VFS. The libc library now features networking support by default with the actual TCP/IP stack implemented in dynamically loaded VFS plugins. An example configuration for using lwIP with DHCP follows:
 <start name="...">
   <config>
     <libc socket="/sockets"/>
       <!-- configure the libc to use a sockets directory -->
     <vfs>
       <dir name="sockets">
         <!-- create a "socket" directory with virtual control files -->
         <lwip dhcp="yes"/>
       </dir>
     </vfs>
   </config>
 </start>
The lwIP library has also been updated to the latest 2.1.2 release.
Java language runtime
OpenJDK support has been added to Genode with release 18.05. At that time, we were only able to offer support for Java's interpreter mode, because of issues that arose on ARM platforms (please refer to the release notes of Genode 18.05). In this mode, byte code is not compiled but interpreted which, of course, introduces a serious performance penalty. Since 18.05, we worked on enabling Java's just-in-time compiler (JIT), which translates byte code to actual machine code. We were able to add support for both ARM and x86 platforms, but for this release, we stopped short of enabling the compiler by default because some stability issues remain.
Please note: OpenJDK has been moved from Genode's base system to the https://codeberg.org/genodelabs/genode-world repository and is now also available as a Genode package.
Ada language runtime
Genode's support for the Ada programming language is maintained by Componolit. With the current release, the runtime-specific code moved to a distinct repository, which is integrated with Genode as a port. It can be installed by executing the following command from the base of Genode's source tree:
./tool/ports/prepare_port ada-runtime
C language runtime
The pthread library has been integrated into the libc library with this release. This has no effect on the semantics of pthreads. Applications simply do not need to link to this library anymore. This is in contrast to normal Unix systems that provide a libpthread library. Our POSIX implementation exists in userspace while supporting the blocking I/O patterns commonly used in Unix. To do this, we run a "kernel" task within the libc library that dispatches I/O as application threads are blocked. This task operates on a secondary stack of the primary thread but is also re-entrant from secondary threads. Maintaining a common implementation for multi-threaded and single-threaded applications has been the most practical approach, and merging pthreads completely into the libc clears the path to improving multithreaded I/O during the next releases.
Improved performance of Zynq network driver
Since the network driver for the Xilinx Zynq-7000 platform was burdened with performance issues, it underwent a review to identify and mitigate conceptual bottlenecks. Although the Gigabit Ethernet MAC (GEM) controller allows DMA-accelerated transmission and reception of network packets, the driver still needed to copy each packet from the packet-stream interface to the DMA memory region. As the latter was additionally attached as uncached memory, the driver showed a very poor performance (i.e. throughput).
Fortunately, the design of the packet-stream interface enabled a zero-copy implementation of the Zynq network driver. Instead of copying each packet from the bulk buffer of the packet-stream interface to a dedicated DMA memory region, the allocated packet buffers are now directly handed over to the GEM for DMA-accelerated packet transmission and reception. In particular, the driver will allocate up to 1024 packet buffers, depending on the bulk buffer size provided by its Nic client.
In addition to the zero-copy implementation, checksum offloading has been enabled. For outbound packets, the GEM automatically fills in the IP, UDP and TCP checksum header fields. Inbound packets will be dropped if their checksum fields are incorrect. Note, that IP checksum offloading is not implemented by qemu.
Furthermore, MAC 802.3 pause frames have been enabled.
Base API changes
The framework's base API received two minor improvements.
First, the util/reconstructible.h utility has a new method called conditional, which simplifies the typical use case for Constructible objects where the constructed/destructed state depends on a configuration parameter. The method alleviates the need to re-implement the logic manually.
Second, when creating a secondary entrypoint, the CPU affinity of the entrypoint is now specified as an argument.
Libraries and applications
Initial version of the Genode SDK
To allow Genode components to be built independently from our build system, we have added a script to generate a Software Development Kit (SDK) that contains headers, pre-built libraries, linker scripts, and pkg-config metadata. The SDK is still experimental and lacks documentation, but has been shown to be useful when combined with some external Make-based build systems as well as the Nimble package manager provided with the Nim programming language.
The SDK includes support for native Genode services as well a C runtime and the C++ standard library.
A simple example of using the SDK within a makefile to build a library:
 ...
 ifeq ($(platform), genode)
   CC       := $(shell pkg-config genode-base --variable=cc)
   CXX      := $(shell pkg-config genode-base --variable=cxx)
   LD       := $(shell pkg-config genode-base --variable=ld)
   AR       := $(shell pkg-config genode-base --variable=ar) -rcs
   CFLAGS   += $(shell pkg-config --cflags genode-libc)
   CXXFLAGS += $(shell pkg-config --cflags genode-stdcxx)
   LDFLAGS  += $(shell pkg-config --libs genode-lib genode-libc genode-stdcxx)
 endif

 %.o: %.c
     $(CC) $(CFLAGS) -c $< -o $@

 %.o: %.cpp
     $(CXX) $(CXXFLAGS) -c $< -o $@

 $(TARGET): $(OBJECTS)
     $(LD) $(OBJECTS) $(LDFLAGS) -o $@
 ...
To link a program, the link flags may be obtained with pkg-config --libs genode-prg, for libraries with pkg-config --libs genode-lib.
In any case, the tools that invoke pkg-config, Make or otherwise, need a PKG_CONFIG_PATH environmental variable set to the location of the pkgconfig directory in the SDK, such as with the following shell command:
PKG_CONFIG_PATH=/opt/genode-sdk-x86_64-18.08/pkgconfig make
It is important to stress that shared libraries must be sourced exclusively from the SDK or otherwise built by the SDK. It is not possible to mix host libraries with cross-compiled Genode libraries. In practice it has not been a problem to build libraries commonly available in the form of shared libraries as static bundled dependencies, such as libogg, libpng, SQLite, etc.
In the future we will investigate expanding the scope of the SDK or complimenting it with add-on SDKs, such as for Qt or SDL.
SSH terminal server
Up to now, we mostly focused on covering the direct interaction of a user with the system. Besides a minimal TCP terminal, there was no component to accommodate remote access. Instead of extending this component to add vital features like TLS or user authentication, we turned to using an existing protocol. For this use case the SSH protocol is the most popular choice as clients and server programs are available for virtually all OSes.
So with this release, we introduce a component that makes Genode's terminal session accessible via SSH. It is based on the server implementation of libssh, which was updated to version 0.8.4. On the Genode side of things, the component acts as a terminal-session server, to which Terminal clients can connect. From the outside, users may access a specific terminal session by logging in via SSH given they provide the proper login credentials. For now, only the SSH channel shell and term requests have been implemented, i.e., the server can be used for interactive sessions but not for scp/rsync or other operations that rely on the exec request. Since the component merely makes terminal sessions available, the SSH connection needs to be forcefully closed by issuing the well-known ~. sequence rather than using ^D (EOF) which the underlying terminal session may not handle as expected.
The following exemplary snippet shows how the component can by configured:
<config port="2022" ed25519_key="/etc/ed25519_host_key
        allow_password="yes" allow_publickey="yes"/>

  <policy label="noux-system" user="root" password="toor"/>
  <policy label="noux-user"   user="user" pub_key="/etc/user.pub"/>

  <vfs>
    <dir name="dev">
      <log/> <rtc/> <jitterentropy name="random"/>
    </dir>
    <dir name="socket"> <lxip dhcp="yes"/> </dir>
    <dir name="etc"> <fs/> </dir>
  </vfs>
  <libc stdout="/dev/log" stderr="/dev/log" rtc="/dev/rtc" socket="/socket"/>
</config>
The component is configured to listen on port 2022 for incoming SSH connections and allows for logging in by using either a password or public key. The <policy> configuration is used to link the terminal session to the SSH login. In this case, the terminal session of the client with the label noux-system may be accessed via the root login. The <vfs> configures the file system of the component. Besides access to the needed services, like the real-time clock, a random device, and the TCP/IP stack a file system session mounted at /etc for housing the files required by the component. In particular, these files are the SSH server's host key and the public key for user login.
For more information, please read repos/gems/src/server/ssh_terminal/README and take repos/gems/run/ssh_terminal.run for a ride.
Removed networking support from Noux
Support for networking has been removed from the Noux runtime as a side effect of moving IP stacks from libc plugins into VFS plugins. In practice, Noux has seldom been used for networking and our recommendation remains that networked applications should link with the libc library and not use the Noux runtime.
New depot packages
Our work on the Genode-based test-automation framework prompted us to a package for each individual test. As a nice byproduct, we introduced depot recipes of all components the tests depend on, and a few more. Thereby, the following new depot content has become available:
Source archives for the base-hw microkernel for various platforms:
-
src/base-hw-arndale
-
src/base-hw-imx53_qsb
-
src/base-hw-imx53_qsb_tz
-
src/base-hw-odroid_xu
-
src/base-hw-panda
-
src/base-hw-rpi
-
src/base-hw-wand_quad
Source archives for the Fiasco.OC microkernel for a few platforms:
-
src/base-foc-pc
-
src/base-foc-arndale
-
src/base-foc-pbxa9
Source archives of components used by the test scenarios:
-
src/nic_bridge
-
src/python
Source archives and package runtimes needed for hosting the gcov tool and the GCC tool chain:
-
src/gmp, src/mpc, src/mpfr
-
src/binutils_x86, src/gcc_x86
-
src/gnumake, src/sed, src/tar, src/which
-
pkg/gcov
-
pkg/noux-build-x86
Platforms
NOVA microhypervisor
Up to now, the NOVA kernel reserved a statically configured part of the system memory as kernel memory. The configured memory had to be chosen at link time. However, in the case of Sculpt, the actual target machine and its available system memory is unknown beforehand, which makes it hard to choose a kernel-memory amount well suited to a such broad use case.
We can't lift this structural issue, but we were able to mitigate it to some degree. The kernel now looks up the overall available system memory at boot time and allocates the kernel memory depending on three build-time configuration options. So, the overall kernel memory is still static, but dimensioned depending on the target machine.
The three configuration options can be adjusted in the Makefile of the kernel. CONFIG_MEMORY_BOOT is the amount of kernel memory allocated in the BSS statically, effectively a link time decision. CONFIG_MEMORY_DYN_MIN and CONFIG_MEMORY_DYN_PER_MILL configures the dynamic part of the kernel-memory allocation applied during early kernel boot time. CONFIG_MEMORY_DYN_MIN is the amount of memory which should be allocated at least. The default is 28 MiB. CONFIG_MEMORY_DYN_PER_MILL defines the amount of the system memory in per mill, which should be allocated at most, and has a default value of 10‰. The overall maximum kernel memory is restricted to ~1G for 64bit, due to the chosen internal virtual memory layout.
Execution on bare hardware (base-hw)
Regarding our own kernel development, the current release increases the performance on supported ARM platforms. Most significantly, the FPU is enabled by default on all boards. All components built for ARMv6 and ARMv7a are now compiled to take advantage of this feature. Therefore, the runtime behaviour of certain scenarios can change significantly on ARM when using the 18.11 release.
Moreover, after recognizing poor memory-access latency on several Cortex-A9 platforms, a regression in the enabling of the L2 cache got discovered and fixed. Especially, the i.MX6 based Wandboard Quad cache, clocking and power settings got tweaked well to achieve reasonable CPU and memory performance.
This performance-wise line of work will be continued with regard to the next release.