
Archive of the past Sculpt OS releases
This is an archive of previous releases of Sculpt OS.
Please find the latest version at the Sculpt OS download page.
Sculpt OS version 25.10
(published in October 2025)
- Instructions
- Download disk image
-
sculpt-25-10.img (35 MiB) (signature, public key)
SHA256 0530fe9b464e717c1b6114d57893783c00946f3fe53a18721b5560ae1fd247ad
Evaluating the use of the human-readable data format (HRD)
The official version linked above readily accepts the new proposed human-readable configuration format in addition to the time-tested use of XML while relying on XML by default.
To evaluate the new format, a Sculpt OS variant using the new format by default is provided at https://depot.genode.org/nfeske/image/.
Please consider the evaluation image as experimental.
- Download disk image using human-readable data by default
-
sculpt-pc-2025-11-21.img.xz (signature, public key)
SHA256 98d21f1e8eef9c157f34476476a3c44bd9b96c28ee25c4fd32935e4d489af345
This variant is also available via Sculpt's system-update dialog by installing version 2025-11-21 provided by nfeske. Both variants the one offered by genodelabs and the one offered by nfeske are largely interoperable. So one can switch between both variants by repeatedly (re-)installing the desired version in the system-update dialog.
Mobile-OS version
An experimental phone variant of Sculpt OS tailored for the PinePhone is available at https://depot.genode.org/genodelabs/image. Information about installing and using this variant are available in the form of a dedicated article at https://genodians.org.
MNT-Reform version
Sculpt OS is available for the i.MX8 variant for the MNT Reform laptop at https://depot.genode.org/skalk/image/ and at the system-update dialog when selecting skalk as provider.
- Download disk image for the MNT-Reform laptop
-
sculpt-mnt_reform2-2025-11-21.img.xz (signature, public key)
SHA256 faa56d41be6d2ec97d3811b74ae645dea43c708626c81f904add3dd07733a61e
Preparing a bootable USB stick on Unix
On Unix-based systems, use the dd command to copy the disk image to a USB stick:
sudo dd if=sculpt-25-10.img of=/dev/sdx bs=1M conv=fsync
Here, /dev/sdx refers to the device node of your USB stick. To determine it, you may inspect the output of dmesg after plugging it in.
Preparing a bootable USB stick on MS Windows
- Option 1: Rufus
-
-
Download and run Rufus (alternative portable executable available)
-
Plug in your USB thumb drive and select it under "Device"
-
Download the Sculpt OS image linked above and select it under "Boot selection"
-
Write to the USB drive by clicking "START"
-
- Option 2: Win32 Disk Imager
-
-
Download, install, and run Win32 Disk Imager
-
Download the Sculpt OS image linked above and select under "Image file"
-
Plug in your USB thumb drive and select it under "Device"
-
Write to the USB drive by clicking "Write"
-
Running Sculpt 25.10 in Qemu
You may take the following command line as starting point for experimenting with Sculpt 25.10 on the Qemu emulator.
 qemu-system-x86_64 -display sdl -cpu Skylake-Client -machine q35 \
                    -m 1024 -drive format=raw,file=sculpt-25-10.img \
                    -netdev user,id=net0 -device e1000,netdev=net0
For better performance, you may also try the options -accel kvm -cpu host.
Sculpt OS version 25.04
(published in April 2025)
- Instructions
- Download disk image
-
sculpt-25-04.img (33 MiB) (signature, public key)
SHA256 54e8bd5f3b7c5ebf0fac84aa2c103d8bb8efa62ef6bcb5a08f2cad42cc29c366
Mobile-OS version
An experimental phone variant of Sculpt OS tailored for the PinePhone is available at https://depot.genode.org/genodelabs/image. Information about installing and using this variant are available in the form of a dedicated article at https://genodians.org.
Preparing a bootable USB stick on Unix
On Unix-based systems, use the dd command to copy the disk image to a USB stick:
sudo dd if=sculpt-25-04.img of=/dev/sdx bs=1M conv=fsync
Here, /dev/sdx refers to the device node of your USB stick. To determine it, you may inspect the output of dmesg after plugging it in.
Preparing a bootable USB stick on MS Windows
- Option 1: Rufus
-
-
Download and run Rufus (alternative portable executable available)
-
Plug in your USB thumb drive and select it under "Device"
-
Download the Sculpt OS image linked above and select it under "Boot selection"
-
Write to the USB drive by clicking "START"
-
- Option 2: Win32 Disk Imager
-
-
Download, install, and run Win32 Disk Imager
-
Download the Sculpt OS image linked above and select under "Image file"
-
Plug in your USB thumb drive and select it under "Device"
-
Write to the USB drive by clicking "Write"
-
Running Sculpt as VirtualBox appliance
-
Download the sculpt-25-04.ova (signature) appliance that contains the Sculpt 25.04 image along with a known-to-work VirtualBox configuration.
SHA256 74b8b57892c5f27b46ce65c5c95e261e25e87d4eb52caa8c5c4b2f6f0abb1740
-
Start VirtualBox and import the OVA file as appliance.
-
After boot, you will be presented with one AHCI boot disk, which you should expand via the administrative user interface before using it.
Running Sculpt 25-04 in Qemu
You may take the following command line as starting point for experimenting with Sculpt 25-04 on the Qemu emulator.
 qemu-system-x86_64 -display sdl -cpu Nehalem-v2 -machine q35 \
                    -m 1024 -drive format=raw,file=sculpt-25-04.img \
                    -netdev user,id=net0 -device e1000,netdev=net0
For better performance, you may also try the options -accel kvm -cpu host.
Sculpt OS version 24.04
(published in October 2024)
- Instructions
- Download disk image
-
sculpt-24-10.img (30 MiB) (signature, public key)
SHA256 6870fb4b0c03b315a7c250c69c29dcdbd31aeb8174f749004652460360144491
Mobile-OS version
An experimental phone variant of Sculpt OS tailored for the PinePhone is available at https://depot.genode.org/genodelabs/image. Information about installing and using this variant are available in the form of a dedicated article at https://genodians.org.
Preparing a bootable USB stick on Unix
On Unix-based systems, use the dd command to copy the disk image to a USB stick:
sudo dd if=sculpt-24-10.img of=/dev/sdx bs=1M conv=fsync
Here, /dev/sdx refers to the device node of your USB stick. To determine it, you may inspect the output of dmesg after plugging it in.
Preparing a bootable USB stick on MS Windows
- Option 1: Rufus
-
-
Download and run Rufus (alternative portable executable available)
-
Plug in your USB thumb drive and select it under "Device"
-
Download the Sculpt OS image linked above and select it under "Boot selection"
-
Write to the USB drive by clicking "START"
-
- Option 2: Win32 Disk Imager
-
-
Download, install, and run Win32 Disk Imager
-
Download the Sculpt OS image linked above and select under "Image file"
-
Plug in your USB thumb drive and select it under "Device"
-
Write to the USB drive by clicking "Write"
-
Running Sculpt as VirtualBox appliance
-
Download the sculpt-24-10.ova (signature) appliance that contains the Sculpt 24.10 image along with a known-to-work VirtualBox configuration.
SHA256 ff87332ece1f10746989902d293f3aeea1f05ad1212bf2e6e1005a1157b74405
-
Start VirtualBox and import the OVA file as appliance.
-
After boot, you will be presented with two disks, the boot disk and an empty disk as playground. You may format the latter using Sculpt's user interface.
Running Sculpt 24.10 in Qemu
You may take the following command line as starting point for experimenting with Sculpt 24.10 on the Qemu emulator.
 qemu-system-x86_64 -display sdl -cpu Nehalem-v2 -machine q35 \
                    -m 1024 -drive format=raw,file=sculpt-24-10.img \
                    -netdev user,id=net0 -device e1000,netdev=net0
For better performance, you may also try the options -accel kvm -cpu host.
Sculpt OS version 24.04
(published in April 2024)
- Instructions
- Download disk image
-
sculpt-24-04.img (30 MiB) (signature, public key)
SHA256 ca696e8755e71e64d0db85c2e5ee092994a226fe0b64944b6979bfc3129f6923
Mobile-OS version
An experimental phone variant of Sculpt OS tailored for the PinePhone is available at https://depot.genode.org/genodelabs/image. Information about installing and using this variant are available in the form of a dedicated article at https://genodians.org.
Preparing a bootable USB stick on Unix
On Unix-based systems, use the dd command to copy the disk image to a USB stick:
sudo dd if=sculpt-24-04.img of=/dev/sdx bs=1M conv=fsync
Here, /dev/sdx refers to the device node of your USB stick. To determine it, you may inspect the output of dmesg after plugging it in.
Preparing a bootable USB stick on MS Windows
- Option 1: Rufus
-
-
Download and run Rufus (alternative portable executable available)
-
Plug in your USB thumb drive and select it under "Device"
-
Download the Sculpt OS image linked above and select it under "Boot selection"
-
Write to the USB drive by clicking "START"
-
- Option 2: Win32 Disk Imager
-
-
Download, install, and run Win32 Disk Imager
-
Download the Sculpt OS image linked above and select under "Image file"
-
Plug in your USB thumb drive and select it under "Device"
-
Write to the USB drive by clicking "Write"
-
Running Sculpt as VirtualBox appliance
-
Download the sculpt-24-04.ova (signature) appliance that contains the Sculpt 24.04 image along with a known-to-work VirtualBox configuration.
SHA256 9e8598ed956fdf4b2df243860151e184dcacbb8b6800ef8b7f247b1cbfe3b159
-
Start VirtualBox and import the OVA file as appliance.
-
After boot, you will be presented with two disks, the boot disk and an empty disk as playground. You may format the latter using Sculpt's user interface.
Running Sculpt 24.04 in Qemu
You may take the following command line as starting point for experimenting with Sculpt 24.04 on the Qemu emulator.
 qemu-system-x86_64 -display sdl -cpu Nehalem-v2 -machine q35 \
                    -m 1024 -drive format=raw,file=sculpt-24-04.img \
                    -netdev user,id=net0 -device e1000,netdev=net0
For better performance, you may also try the options -accel kvm -cpu host.
Sculpt OS version 23.10
(published in October 2023)
- Instructions
- Download disk image
-
sculpt-23-10.img (29 MiB) (signature, public key)
SHA256 63f6c768dc0e6fa270965d917e4ea692dc7c5e1188aa2dc544cb4afa5724221a
Preparing a bootable USB stick on Unix
On Unix-based systems, use the dd command to copy the disk image to a USB stick:
sudo dd if=sculpt-23-10.img of=/dev/sdx bs=1M conv=fsync
Here, /dev/sdx refers to the device node of your USB stick. To determine it, you may inspect the output of dmesg after plugging it in.
Preparing a bootable USB stick on MS Windows
- Option 1: Rufus
-
-
Download and run Rufus (alternative portable executable available)
-
Plug in your USB thumb drive and select it under "Device"
-
Download the Sculpt OS image linked above and select it under "Boot selection"
-
Write to the USB drive by clicking "START"
-
- Option 2: Win32 Disk Imager
-
-
Download, install, and run Win32 Disk Imager
-
Download the Sculpt OS image linked above and select under "Image file"
-
Plug in your USB thumb drive and select it under "Device"
-
Write to the USB drive by clicking "Write"
-
Running Sculpt as VirtualBox appliance
-
Download the sculpt-23-10.ova (signature) appliance that contains the Sculpt 23.10 image along with a known-to-work VirtualBox configuration.
SHA256 6cbd9ff809d0741a944e6ecb7e64ff7c8f94ce77a94d2dde2113ee1c8adae798
-
Start VirtualBox and import the OVA file as appliance.
-
After boot, you will be presented with two disks, the boot disk and an empty disk as playground. You may format the latter using Sculpt's user interface.
Running Sculpt 23.10 in Qemu
You may take the following command line as starting point for experimenting with Sculpt 23.10 on the Qemu emulator.
 qemu-system-x86_64 -display sdl -cpu core2duo -machine q35 \
                    -m 1024 -drive format=raw,file=sculpt-23-10.img \
                    -netdev user,id=net0 -device e1000,netdev=net0
Sculpt OS version 23.04
(published in April 2023)
Sculpt is an open-source general-purpose OS. It combines Genode's microkernel architecture, capability-based security, sandboxed device drivers, and virtual machines in a novel operating system for commodity PC hardware and the PinePhone. Sculpt is used as day-to-day OS by the Genode developers.
- Instructions
- Download disk image
-
sculpt-23-04.img (29 MiB) (signature)
SHA256 48cf9d85bcce5db657c1572372da75c247a91e2116f438a8b350bc6908ec71d2
Mobile-OS version
An early phone variant of Sculpt OS tailored for the PinePhone is available at https://depot.genode.org/genodelabs/image. Information about installing and using this variant are available in the form of a dedicated article at https://genodians.org.
Preparing a bootable USB stick on Unix
On Unix-based systems, use the dd command to copy the disk image to a USB stick:
sudo dd if=sculpt-23-04.img of=/dev/sdx bs=1M conv=fsync
Here, /dev/sdx refers to the device node of your USB stick. To determine it, you may inspect the output of dmesg after plugging it in.
Preparing a bootable USB stick on MS Windows
- Option 1: Rufus
-
-
Download and run Rufus (alternative portable executable available)
-
Plug in your USB thumb drive and select it under "Device"
-
Download the Sculpt OS image linked above and select it under "Boot selection"
-
Write to the USB drive by clicking "START"
-
- Option 2: Win32 Disk Imager
-
-
Download, install, and run Win32 Disk Imager
-
Download the Sculpt OS image linked above and select under "Image file"
-
Plug in your USB thumb drive and select it under "Device"
-
Write to the USB drive by clicking "Write"
-
Running Sculpt as VirtualBox appliance
-
Download the sculpt-23-04.ova (signature) appliance that contains the Sculpt 23.04 image along with a known-to-work VirtualBox configuration.
SHA256 9912553a59709aec8ffa36ab21514016a765115a9be518193a4328a177445a78
-
Start VirtualBox and import the OVA file as appliance.
-
After boot, you will be presented with two disks, the boot disk and an empty disk as playground. You may format the latter using Sculpt's user interface.
Running Sculpt 23.04 in Qemu
You may take the following command line as starting point for experimenting with Sculpt 23.04 on the Qemu emulator.
 qemu-system-x86_64 -display sdl -cpu core2duo -machine q35 \
                    -m 1024 -drive format=raw,file=sculpt-23-04.img \
                    -netdev user,id=net0 -device e1000,netdev=net0
Sculpt OS version 22.10
(published in October 2022)
- Instructions
- Download disk image
-
sculpt-22-10.img (28 MiB) (signature)
SHA256 b0d5530e3a6836ca231bd5a962e08d3db2ca5032f59b9287149c5acc45b81ee8
Preparing a bootable USB stick on Unix
On Unix-based systems, use the dd command to copy the disk image to a USB stick:
sudo dd if=sculpt-22-10.img of=/dev/sdx bs=1M conv=fsync
Here, /dev/sdx refers to the device node of your USB stick. To determine it, you may inspect the output of dmesg after plugging it in.
Preparing a bootable USB stick on MS Windows
- Option 1: Rufus
-
-
Download and run Rufus (alternative portable executable available)
-
Plug in your USB thumb drive and select it under "Device"
-
Download the Sculpt OS image linked above and select it under "Boot selection"
-
Write to the USB drive by clicking "START"
-
- Option 2: Win32 Disk Imager
-
-
Download, install, and run Win32 Disk Imager
-
Download the Sculpt OS image linked above and select under "Image file"
-
Plug in your USB thumb drive and select it under "Device"
-
Write to the USB drive by clicking "Write"
-
Running Sculpt as VirtualBox appliance
-
Download the sculpt-22-10.ova (signature) appliance that contains the Sculpt 22.10 image along with a known-to-work VirtualBox configuration.
SHA256 b3a59bec5e2ecc1717481b0baa23c4e47c19afd8dadb3e625956d1bf9e7751b8
-
Start VirtualBox and import the OVA file as appliance.
-
After boot, you will be presented with two disks, the boot disk and an empty disk as playground. You may format the latter using Sculpt's user interface.
Running Sculpt 22.10 in Qemu
You may take the following command line as starting point for experimenting with Sculpt 22.10 on the Qemu emulator.
 qemu-system-x86_64 -display sdl -cpu core2duo -machine q35 \
                    -m 1024 -drive format=raw,file=sculpt-22-10.img \
                    -netdev user,id=net0 -device e1000,netdev=net0
Sculpt OS version 22.04
(published in April 2022)
- Instructions
- Download disk image
-
sculpt-22-04.img (28 MiB) (signature)
SHA256 9e13b6befbb335c143595ed7b19ccd58ef9b64987c99cf2da23161f279f7d40a
Preparing a bootable USB stick on Unix
On Unix-based systems, use the dd command to copy the disk image to a USB stick:
sudo dd if=sculpt-22-04.img of=/dev/sdx bs=1M conv=fsync
Here, /dev/sdx refers to the device node of your USB stick. To determine it, you may inspect the output of dmesg after plugging it in.
Preparing a bootable USB stick on MS Windows
- Option 1: Rufus
-
-
Download and run Rufus (alternative portable executable available)
-
Plug in your USB thumb drive and select it under "Device"
-
Download the Sculpt OS image linked above and select it under "Boot selection"
-
Write to the USB drive by clicking "START"
-
- Option 2: Win32 Disk Imager
-
-
Download, install, and run Win32 Disk Imager
-
Download the Sculpt OS image linked above and select under "Image file"
-
Plug in your USB thumb drive and select it under "Device"
-
Write to the USB drive by clicking "Write"
-
Running Sculpt as VirtualBox appliance
-
Download the sculpt-22-04.ova (signature) appliance that contains the Sculpt 22.04 image along with a known-to-work VirtualBox configuration.
SHA256 b76eff1e446835f3a2129bdb8cc6184863bc7c85d4f2b3814974022af93af865
-
Start VirtualBox and import the OVA file as appliance.
-
After boot, you will be presented with two disks, the boot disk and an empty disk as playground. You may format the latter using Sculpt's user interface.
Running Sculpt 22.04 in Qemu
You may take the following command line as starting point for experimenting with Sculpt 22.04 on the Qemu emulator.
 qemu-system-x86_64 -display sdl -cpu core2duo -machine q35 \
                    -m 1024 -drive format=raw,file=sculpt-22-04.img \
                    -netdev user,id=net0 -device e1000,netdev=net0
Sculpt OS version 21.10
(published in October 2021)
- Instructions
- Download disk image
-
sculpt-21-10.img (27 MiB) (signature)
SHA256 a6c1cf9b438f084fa9fe6b8dabc256e5f62c51eecdcfecb47fd262427a4d1444
Preparing a bootable USB stick on Unix
On Unix-based systems, use the dd command to copy the disk image to a USB stick:
sudo dd if=sculpt-21-10.img of=/dev/sdx bs=1M conv=fsync
Here, /dev/sdx refers to the device node of your USB stick. To determine it, you may inspect the output of dmesg after plugging it in.
Preparing a bootable USB stick on MS Windows
- Option 1: Rufus
-
-
Download and run Rufus (alternative portable executable available)
-
Plug in your USB thumb drive and select it under "Device"
-
Download the Sculpt OS image linked above and select it under "Boot selection"
-
Write to the USB drive by clicking "START"
-
- Option 2: Win32 Disk Imager
-
-
Download, install, and run Win32 Disk Imager
-
Download the Sculpt OS image linked above and select under "Image file"
-
Plug in your USB thumb drive and select it under "Device"
-
Write to the USB drive by clicking "Write"
-
Running Sculpt as VirtualBox appliance
-
Download the sculpt-21-10.ova (signature) appliance that contains the Sculpt 21.10 image along with a known-to-work VirtualBox configuration.
SHA256 d2c1c47a5d641b58e9c6b96ee82fa1df83582338534d43fcb4db02ee1c88eb21
-
Start VirtualBox and import the OVA file as appliance.
-
After boot, you will be presented with two disks, the boot disk and an empty disk as playground. You may format the latter using Sculpt's user interface.
Running Sculpt 21.10 in Qemu
You may take the following command line as starting point for experimenting with Sculpt 21.10 on the Qemu emulator.
 qemu-system-x86_64 -display sdl -cpu core2duo -machine q35 \
                    -m 1024 -drive format=raw,file=sculpt-21-10.img \
                    -netdev user,id=net0 -device e1000,netdev=net0
Version 21.03
(published in March 2021)
- Instructions
- Download disk image
-
sculpt-21-03b.img (27 MiB) (signature)
SHA256 75485dc37e097f64136abd6560d1cc0cde87cb37ce6d4bb71afe60b84dd57e5e
- Summary of the changes since the previous version
Preparing a bootable USB stick on Unix
On Unix-based systems, use the dd command to copy the disk image to a USB stick:
sudo dd if=sculpt-21-03b.img of=/dev/sdx bs=1M conv=fsync
Here, /dev/sdx refers to the device node of your USB stick. To determine it, you may inspect the output of dmesg after plugging it in.
Preparing a bootable USB stick on MS Windows
- Option 1: Rufus
-
-
Download and run Rufus (alternative portable executable available)
-
Plug in your USB thumb drive and select it under "Device"
-
Download the Sculpt OS image linked above and select it under "Boot selection"
-
Write to the USB drive by clicking "START"
-
- Option 2: Win32 Disk Imager
-
-
Download, install, and run Win32 Disk Imager
-
Download the Sculpt OS image linked above and select under "Image file"
-
Plug in your USB thumb drive and select it under "Device"
-
Write to the USB drive by clicking "Write"
-
Running Sculpt as VirtualBox appliance
-
Download the sculpt-21-03b.ova (signature) appliance that contains the Sculpt 21.03 image along with a known-to-work VirtualBox configuration.
SHA256 609046fb1c23ee4ea15e618168d21c83479caed5a64ccc879b73558207a50087
-
Start VirtualBox and import the OVA file as appliance.
-
After boot, you will be presented with two disks, the boot disk and an empty disk as playground. You may format the latter using Sculpt's user interface.
Running Sculpt 21.03 in Qemu
You may take the following command line as starting point for experimenting with Sculpt 21.03 on the Qemu emulator.
 qemu-system-x86_64 -display sdl -cpu core2duo -machine q35 \
                    -m 1024 -drive format=raw,file=sculpt-21-03b.img \
                    -netdev user,id=net0 -device e1000,netdev=net0
Version 20.08
(published in September 2020)
- Instructions
- Download disk image
-
sculpt-20-08-b.img (26 MiB) (signature)
SHA256 d8d92e701e454766364b5e3233b75a5edabf48d761301b3b9912dbb69af85899
Preparing a bootable USB stick on Unix
On Unix-based systems, use the dd command to copy the disk image to a USB stick:
sudo dd if=sculpt-20-08-b.img of=/dev/sdx bs=1M conv=fsync
Here, /dev/sdx refers to the device node of your USB stick. To determine it, you may inspect the output of dmesg after plugging it in.
Preparing a bootable USB stick on MS Windows
- Option 1: Rufus
-
-
Download and run Rufus (alternative portable executable available)
-
Plug in your USB thumb drive and select it under "Device"
-
Download the Sculpt OS image linked above and select it under "Boot selection"
-
Write to the USB drive by clicking "START"
-
- Option 2: Win32 Disk Imager
-
-
Download, install, and run Win32 Disk Imager
-
Download the Sculpt OS image linked above and select under "Image file"
-
Plug in your USB thumb drive and select it under "Device"
-
Write to the USB drive by clicking "Write"
-
Running Sculpt as VirtualBox appliance
-
Download the sculpt-20-08-b.ova (signature) appliance that contains the Sculpt 20.08 image along with a known-to-work VirtualBox configuration.
SHA256 b3ac6ef1dd1ae466293d5ff2aefa2efb425f181a495209c17b196c1f7986107e
-
Start VirtualBox and import the OVA file as appliance.
-
After boot, you will be presented with two disks, the boot disk and an empty disk as playground. You may format the latter using Sculpt's user interface.
Running Sculpt 20.08 in Qemu
You may take the following command line as starting point for experimenting with Sculpt 20.08 on the Qemu emulator.
 qemu-system-x86_64 -display sdl -cpu core2duo -machine q35 \
                    -m 1024 -drive format=raw,file=sculpt-20-08-b.img \
                    -netdev user,id=net0 -device e1000,netdev=net0
Version 20.02
(published in March 2020)
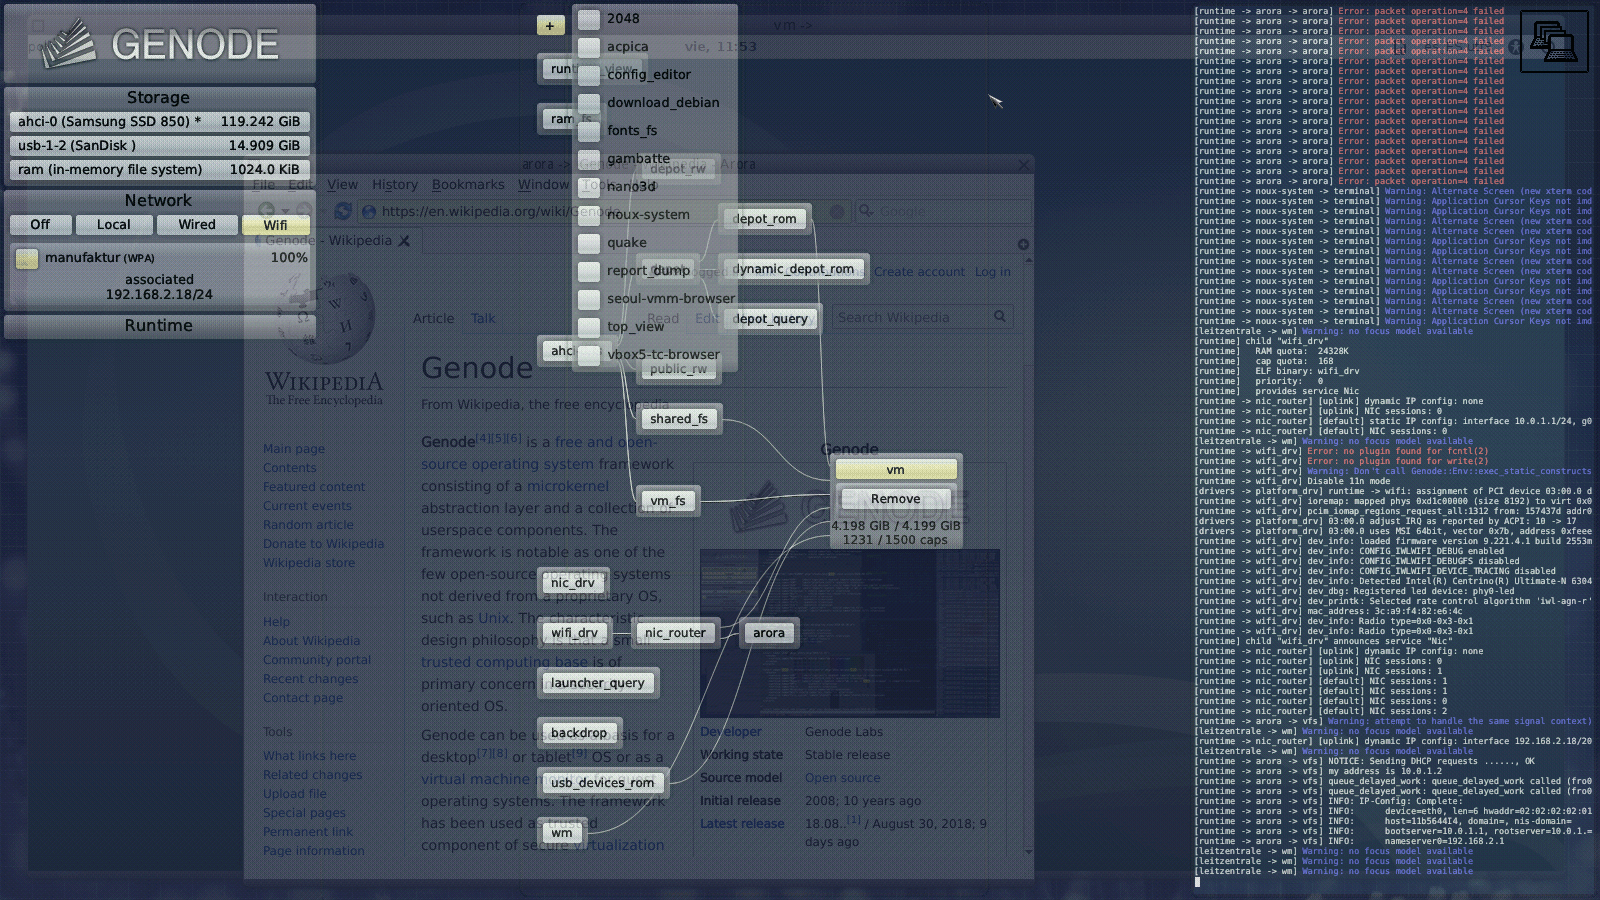
The administrative user interface ("Leitzentrale"): The panel at the top gives access to the live components view (shown), a file browser, and network connectivity. The interactive graph in the center presents the system components with their relationships and allows the user to interactively add/remove components offered by federated software providers.
- Instructions
- Download disk image
-
sculpt-20-02.img (26 MiB) (signature)
SHA256 b37dc12c2d8c0b4ddd17902a03de3759ca598a1cfde88f2c10472b41c0a5cac5
Preparing a bootable USB stick on Unix
On Unix-based systems, use the dd command to copy the disk image to a USB stick:
sudo dd if=sculpt-20-02.img of=/dev/sdx bs=1M conv=fsync
Here, /dev/sdx refers to the device node of your USB stick. To determine it, you may inspect the output of dmesg after plugging it in.
Preparing a bootable USB stick on MS Windows
- Option 1: Rufus
-
-
Download and run Rufus (alternative portable executable available)
-
Plug in your USB thumb drive and select it under "Device"
-
Download the Sculpt OS image linked above and select it under "Boot selection"
-
Write to the USB drive by clicking "START"
-
- Option 2: Win32 Disk Imager
-
-
Download, install, and run Win32 Disk Imager
-
Download the Sculpt OS image linked above and select under "Image file"
-
Plug in your USB thumb drive and select it under "Device"
-
Write to the USB drive by clicking "Write"
-
Running Sculpt as VirtualBox appliance
-
Download the sculpt-20-02.ova (signature) appliance that contains the Sculpt 20.02 image along with a known-to-work VirtualBox configuration.
SHA256 465a00f7307ae52dbbe919952ea8523568e375ed7f8d2da0b5ff95ee6a57c748
-
Start VirtualBox and import the OVA file as appliance.
-
After boot, you will be presented with two disks, the boot disk and an empty disk as playground. You may format the latter using Sculpt's user interface.
Running Sculpt 20.02 in Qemu
You may take the following command line as starting point for experimenting with Sculpt 20.02 on the Qemu emulator.
 qemu-system-x86_64 -display sdl -cpu core2duo -machine q35 \
                    -m 1024 -drive format=raw,file=sculpt-20-02.img \
                    -netdev user,id=net0 -device e1000,netdev=net0
Version 19.07
(published in July 2019)
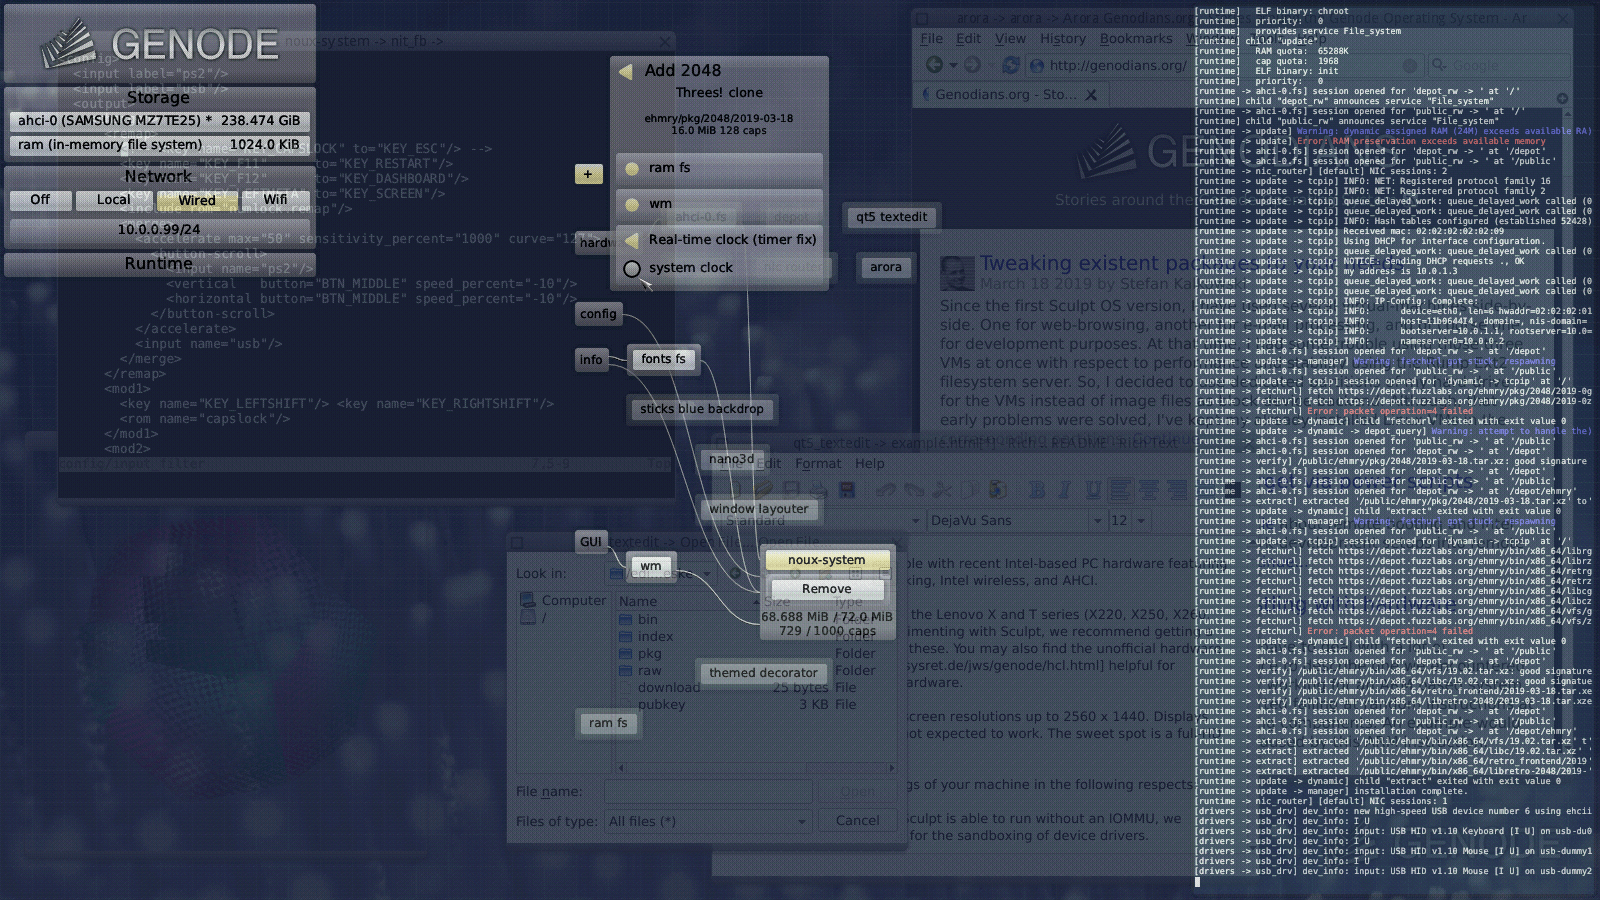
The administrative user interface ("Leitzentrale"): The menu on the left provides a convenient way to access and manage storage and to control network connectivity. The interactive graph in the center presents the system components with their relationships and allows the user to interactively add/remove components offered by federated software providers.
- Instructions
- Download disk image
-
sculpt-19-07.img (24 MiB)
SHA256 13010eafde20426c65998d3496b0269b82e5185ec14085c76ab57c9014ba7e04
Preparing a bootable USB stick on Unix
On Unix-based systems, use the dd command to copy the disk image to a USB stick:
sudo dd if=sculpt-19-07.img of=/dev/sdx bs=1M conv=fsync
Here, /dev/sdx refers to the device node of your USB stick. To determine it, you may inspect the output of dmesg after plugging it in.
Preparing a bootable USB stick on MS Windows
- Option 1: Rufus
-
-
Download and run Rufus (alternative portable executable available)
-
Plug in your USB thumb drive and select it under "Device"
-
Download the Sculpt OS image linked above and select it under "Boot selection"
-
Write to the USB drive by clicking "START"
-
- Option 2: Win32 Disk Imager
-
-
Download, install, and run Win32 Disk Imager
-
Download the Sculpt OS image linked above and select under "Image file"
-
Plug in your USB thumb drive and select it under "Device"
-
Write to the USB drive by clicking "Write"
-
Running Sculpt as VirtualBox appliance
-
Download the sculpt-19-07.ova (signature) appliance that contains the Sculpt 19.07 image along with a known-to-work VirtualBox configuration.
SHA256 9369d4f1f6f5e75543d912d06d1b5e229fae3b9ac2203f239e35d0d4f9bd2333
-
Start VirtualBox and import the OVA file as appliance.
-
After boot, you will be presented with two disks, the boot disk and an empty disk as playground. You may format the latter using Sculpt's user interface.
Running Sculpt 19.07 in Qemu
You may take the following command line as starting point for experimenting with Sculpt 19.07 on the Qemu emulator.
 qemu-system-x86_64 -display sdl -cpu core2duo -machine q35 \
                    -m 1024 -drive format=raw,file=sculpt-19-07.img \
                    -netdev user,id=net0 -device e1000,netdev=net0
Sculpt as a Community Experience (CE)
(published in March 2019)
As explained in the accompanying blog posting, Sculpt CE features a new user interface to integrate software into the running system and to reveal the trusted computing base of each component. The integrity of the installed software is protected by digital signatures of the software providers while each piece of software is sandboxed both at installation time and at runtime. This way, users don't need to be faithful but enter a position of ultimate control.
- Instructions
- Download disk image
-
sculpt-ce.img (24 MiB)
SHA256 359ccabed4d20719a9aa57420440764914a0e5f327cdc1cc42ea7eb5c5808c5a
Preparing a bootable USB stick on Unix
On Unix-based systems, use the dd command to copy the disk image to a USB stick:
sudo dd if=sculpt-ce.img of=/dev/sdx bs=1M conv=fsync
Here, /dev/sdx refers to the device node of your USB stick. To determine it, you may inspect the output of dmesg after plugging it in.
Preparing a bootable USB stick on MS Windows
- Option 1: Rufus
-
-
Download and run Rufus (alternative portable executable available)
-
Plug in your USB thumb drive and select it under "Device"
-
Download the Sculpt OS image linked above and select it under "Boot selection"
-
Write to the USB drive by clicking "START"
-
- Option 2: Win32 Disk Imager
-
-
Download, install, and run Win32 Disk Imager
-
Download the Sculpt OS image linked above and select under "Image file"
-
Plug in your USB thumb drive and select it under "Device"
-
Write to the USB drive by clicking "Write"
-
Running Sculpt CE as VirtualBox appliance
-
Download the sculpt-ce.ova (signature) appliance that contains the Sculpt CE image along with a known-to-work VirtualBox configuration.
SHA256 4305ff93ea0aa6411af7bfecf0d0c046de9ff3c3da14b6cfa9a74d34ea0b2753
-
Start VirtualBox and import the OVA file as appliance.
-
After boot, you will be presented with two disks, the boot disk and an empty disk as playground. You may format the latter using Sculpt's user interface.
Running Sculpt CE in Qemu
You may take the following command line as starting point for experimenting with Sculpt CE on the Qemu emulator.
 qemu-system-x86_64 -display sdl -cpu core2duo -machine q35 \
                    -m 1024 -drive format=raw,file=sculpt-ce.img \
                    -netdev user,id=net0 -device e1000,netdev=net0
Sculpt with Visual Composition (VC)
(published in September 2018)
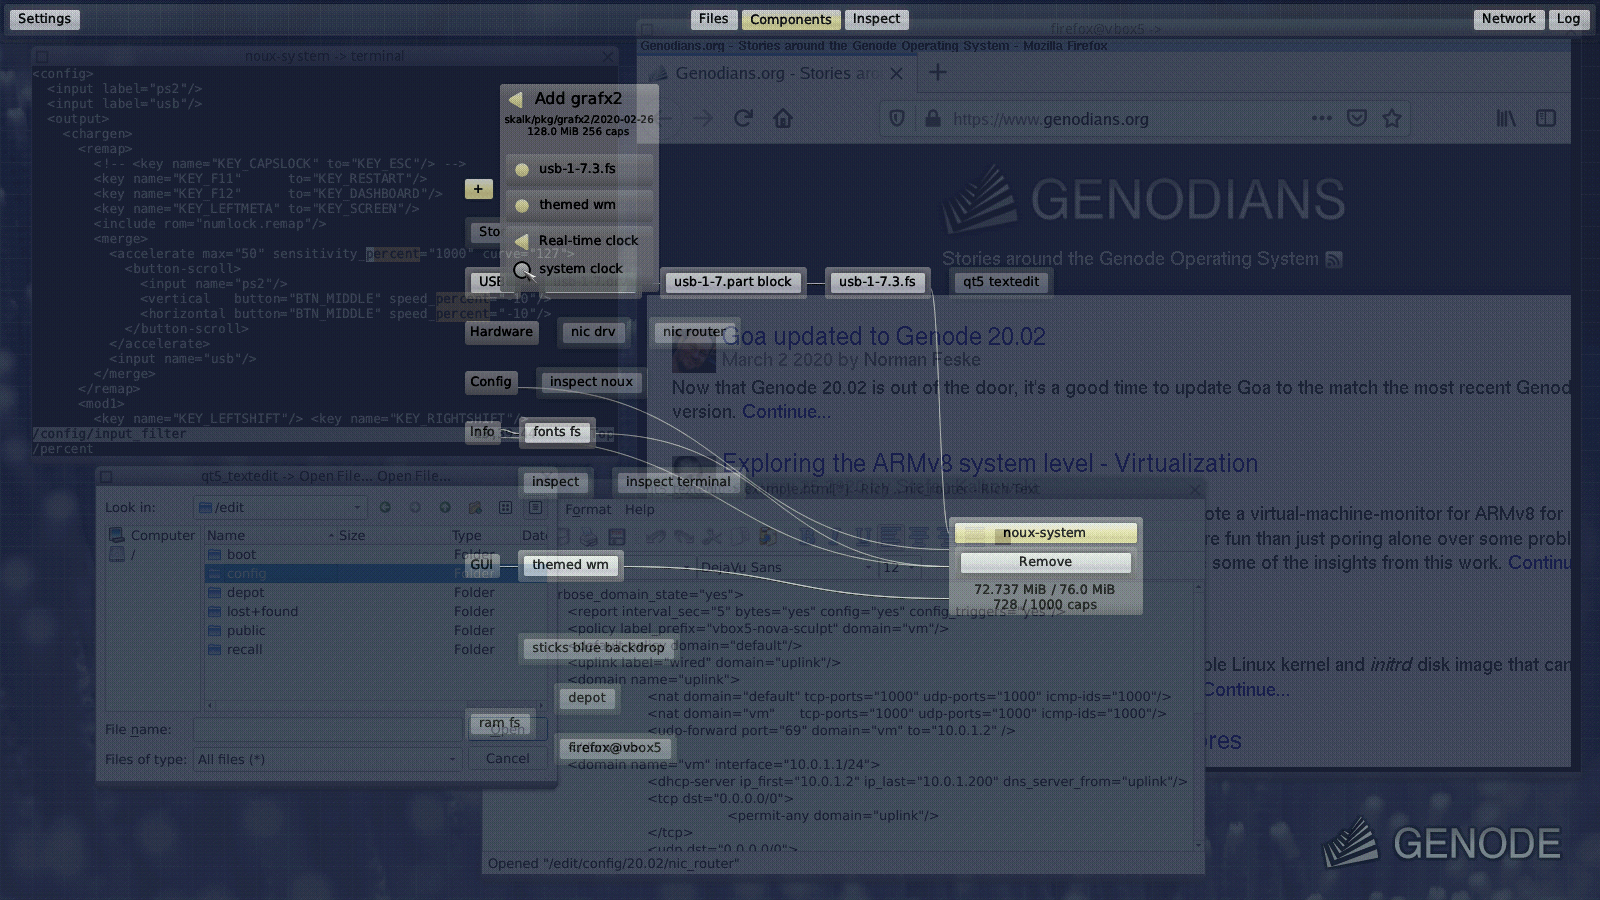
The administrative user interface ("Leitzentrale"): The menu on the left provides a convenient way to access and manage storage and to control network connectivity. The interactive graph in the center presents the system components with their relationships and allows the user to interactively add/remove components.
- Instructions
- Download disk image
-
sculpt-vc.img (24 MiB)
SHA256 e9c012363cd5dce46dc972ad48c0252907b30331ac44971aee88301c0e7b1f42
Preparing a bootable USB stick on Unix
On Unix-based systems, use the dd command to copy the disk image to a USB stick:
sudo dd if=sculpt-vc.img of=/dev/sdx bs=1M conv=fsync
Here, /dev/sdx refers to the device node of your USB stick. To determine it, you may inspect the output of dmesg after plugging it in.
Preparing a bootable USB stick on MS Windows
- Option 1: Rufus
-
-
Download and run Rufus (alternative portable executable available)
-
Plug in your USB thumb drive and select it under "Device"
-
Download the Sculpt OS image linked above and select it under "Boot selection"
-
Write to the USB drive by clicking "START"
-
- Option 2: Win32 Disk Imager
-
-
Download, install, and run Win32 Disk Imager
-
Download the Sculpt OS image linked above and select under "Image file"
-
Plug in your USB thumb drive and select it under "Device"
-
Write to the USB drive by clicking "Write"
-
Running Sculpt VC as VirtualBox appliance
-
Download the sculpt-vc.ova appliance that contains the Sculpt VC image along with a known-to-work VirtualBox configuration.
SHA256 20c1ffd7c91fe26195100fe3be2721367a39654657d125e9fd8e3dfafdeb72d0
-
Start VirtualBox and import the OVA file as appliance.
-
After boot, you will be presented with two disks, the boot disk and an empty disk as playground. You may format the latter using Sculpt's user interface.
Sculpt for The Curious (TC)
(published in June 2018)
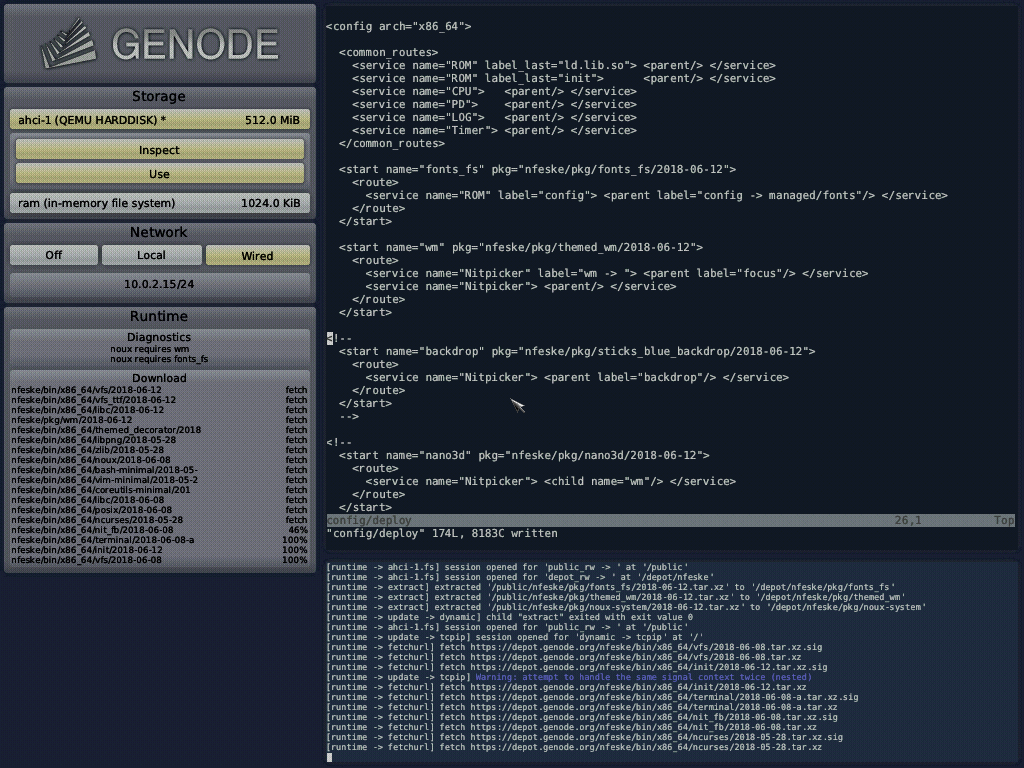
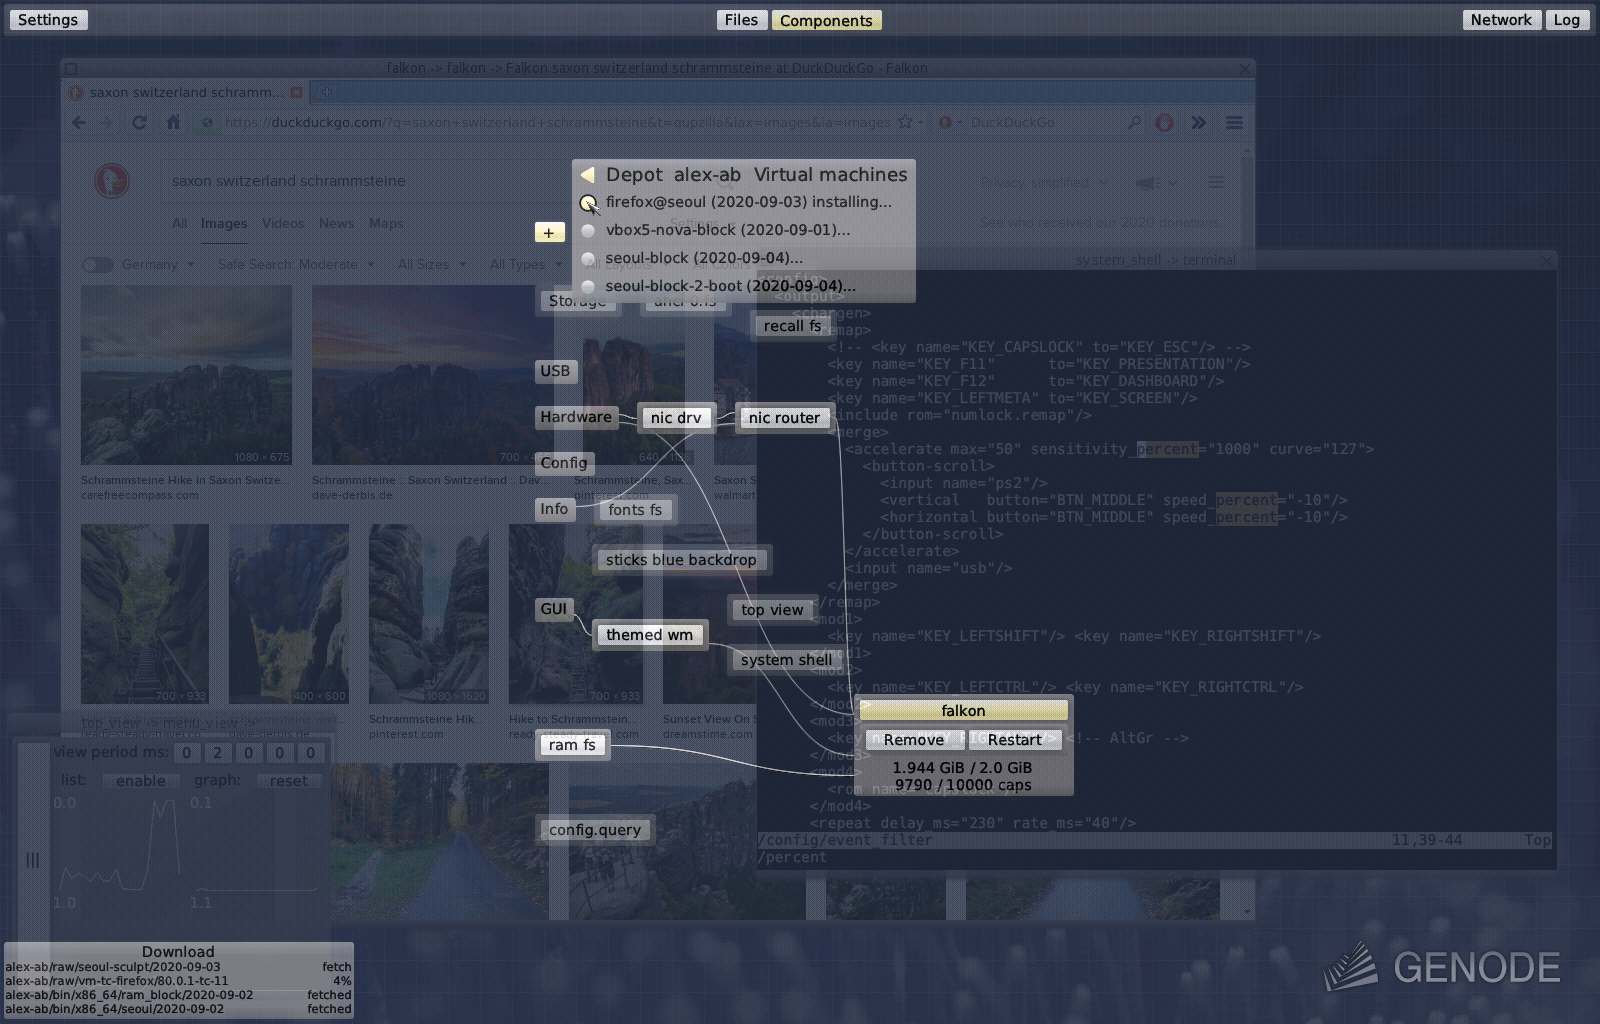
The administrative user interface ("Leitzentrale"): The menu on the left provides a convenient way to access and manage storage and to control network connectivity. The main window allows the user to interactively shape the operating system using the Vim text editor. In the depicted scenario, the user just added a few new subsystems, which are currently being installed. The log on the bottom gives feedback about current activities.

The desktop: Firefox runs on TinyCore Linux inside a virtual machine. The Qt-based text editor allows the user to edit configurations - like the user-level network routing - live. On the top-right, the current CPU load is displayed. The terminal window below hosts the light-weight noux runtime environment for executing command-line-based Unix software.
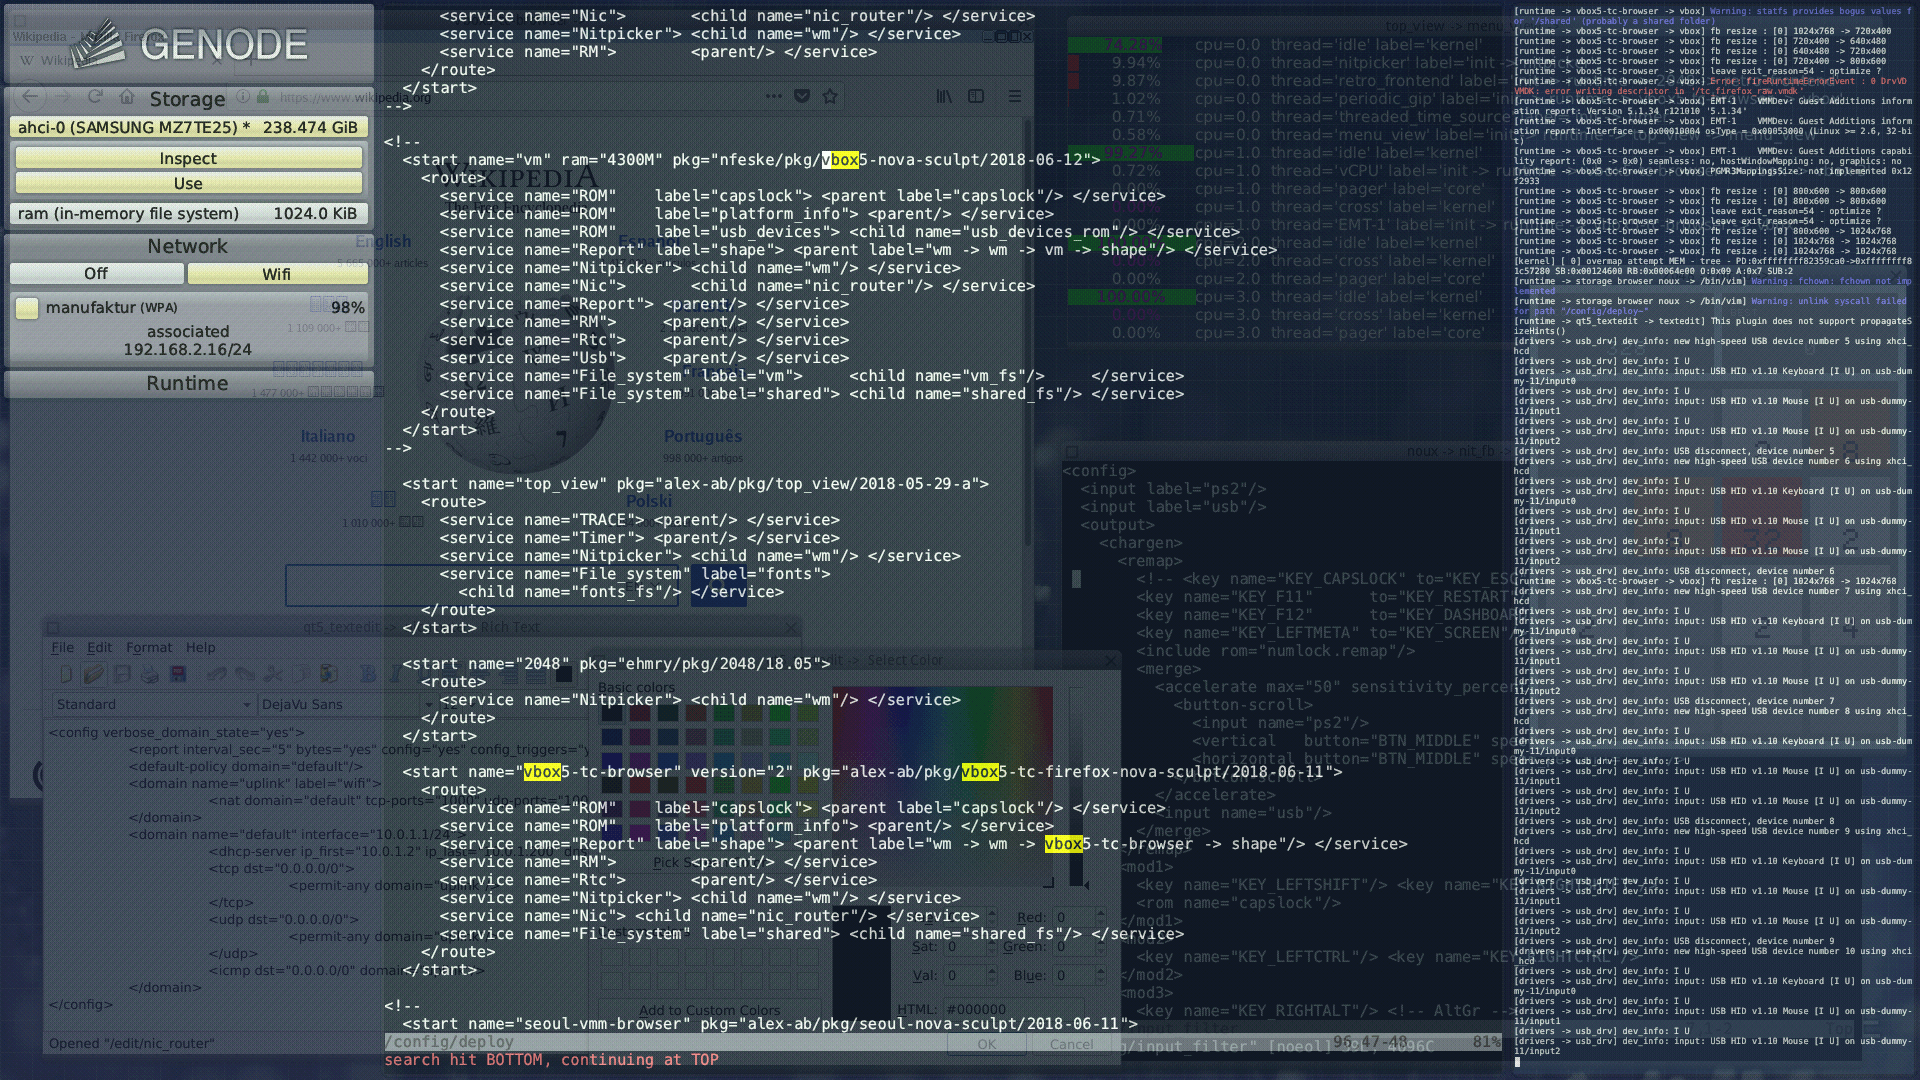
The press of a button activates the "Leitzentrale" overlay, which empowers the user to inspect and change (sculpt) almost all aspects of the running system on the fly.
- Instructions
- Download disk image
-
sculpt-tc.img (20 MiB)
SHA256 b3a299ec6f6d582a724e417dd8ff5613833f8702ebd7300a54de8a8ad2844c5b
Preparing a bootable USB stick on Unix
On Unix-based systems, use the dd command to copy the disk image to a USB stick:
sudo dd if=sculpt-tc.img of=/dev/sdx bs=1M conv=fsync
Here, /dev/sdx refers to the device node of your USB stick. To determine it, you may inspect the output of dmesg after plugging it in.
Preparing a bootable USB stick on MS Windows
- Option 1: Rufus
-
-
Download and run Rufus (alternative portable executable available)
-
Plug in your USB thumb drive and select it under "Device"
-
Download the Sculpt OS image linked above and select it under "Boot selection"
-
Write to the USB drive by clicking "START"
-
- Option 2: Win32 Disk Imager
-
-
Download, install, and run Win32 Disk Imager
-
Download the Sculpt OS image linked above and select under "Image file"
-
Plug in your USB thumb drive and select it under "Device"
-
Write to the USB drive by clicking "Write"
-
Running Sculpt TC as VirtualBox appliance
-
Download the sculpt-tc.ova appliance that contains the Sculpt TC image along with a known-to-work VirtualBox configuration.
SHA256 1d2c8b3720a7dbdf715feb3b53e897166eacb588cdb902f0c23b2a9512d52250
-
Start VirtualBox and import the OVA file as appliance.
-
After boot, you will be presented with two disks, the boot disk and an empty disk as playground. You may format the latter using Sculpt's user interface.