
The story behind Genode's TrustZone demo on the USB Armory
|
Starting point Design improvement and stabilization Usability improvement The result |
Starting point
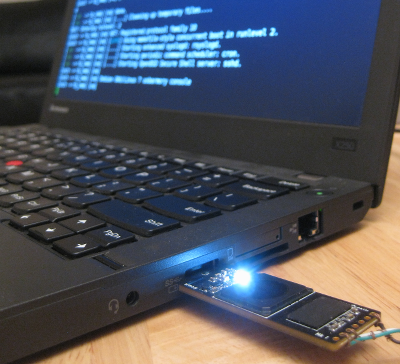
With Genode 15.02, we introduced basic support for the USB Armory through our custom kernel in the base-hw repository. Alongside this, we also announced support for the TrustZone VMM demo - a scenario demonstrating a guest OS being monitored by a Genode hypervisor leveraging the protection mechanism of ARM TrustZone. At the time, the guest OS was a Linux 3.18 with a BusyBox RAM disk. This setting was sufficient to showcase the physical separation of software, but it lacked the full feature set of the native Linux setup delivered with the board and promoted in the online documentation. Most significant was the missing USB support and CDC Ethernet that enable the USB Armory to communicate via TCP/IP with its host. With this line of work, we have the goal to reach feature parity with the original USB Armory setup while putting Linux ("normal" world) under the supervision of Genode ("secure" world). Our initial exploration of the ARM TrustZone technology, which served as base for the USB Armory support, is described at: http://genode.org/documentation/articles/trustzone
|
Design improvement and stabilization
The first step towards this goal was a Linux update, since the upstream Amory project closely follows the Linux mainline branch. Linux had already reached kernel version 4.2. This was easy. However, the next step was tricky: Of course, we wanted to use one of the available root file systems supported by USB Armory out of the box. The documentation offers two options, namely a Debian and a Ubuntu root file system. But none of the two worked well with our initrd approach. The images were simply too big. Even after reducing the so-called secure RAM of the Genode monitor to a minimum in order to accommodate the non-secure world, the memory did not suffice. We were forced to let Linux mount its root file system the usual way which is directly from SD card. At the other hand, we also wanted the SD host controller (eSDHC) of the USB Armory to be protected by TrustZone. In principle, this would enable us to perform the SD-card encryption with the key never leaving the secure world. Therefore, providing limited access to the non-secure guest through a para-virtualized driver seemed like a good solution that meets all these goals.
Since release 15.05, Genode contains a native eSDHC driver that is now used as the back end for the para-virtualizated Linux driver. It has been implemented by taking the Linux 3.18 driver as a reference. We modified the TrustZone settings for eSDHC on the USB Armory. Access to MMIO and interrupts is forbidden for the non-secure world whereas the DMA engine of the eSDHC is allowed to access secure RAM. To achieve the separation of secure and non-secure data on the SD card, we created two partitions and interposed the Genode partition manager (part_blk) between the eSDHC driver and its clients. This way, the partitions are addressable as separate block sessions and one can easily grant or deny access to each of them through session routing. Using this mechanism, the access of the Genode component that is responsible for monitoring the guest OS via TrustZone (TZ-VMM) is restricted to the untrusted partition only.
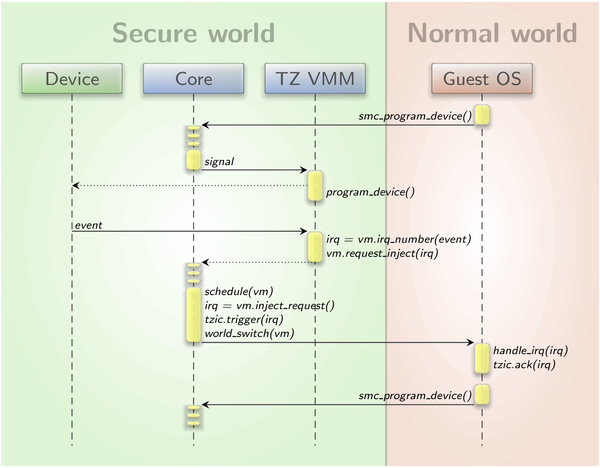
At this point, the missing link was the connection between the block-session interface in the secure TZ-VMM and the block driver interface in the non-secure Linux. This translation obviously crosses the border between the two TrustZone worlds. We incorporated different means of communication to bridge this gap. For synchronous RPC-like requests with small data payloads, e.g., requesting the block size, the "secure monitor call" or SMC instruction of the ARM security extensions is used. When it comes to bigger payloads, like the transfer of bulk data for a write request, a shared buffer in non-secure RAM is required. Last but not least, asynchronous notifications such as block-request completions are best communicated by injecting interrupts into the guest. The latter is done through the software-interrupt register (SWINT) of the TrustZone-aware interrupt controller, called TZIC. However, this register cannot be accessed in a user component like TZ-VMM as the whole TZIC is restricted to the kernel. Thus, we followed a pattern that is also used in the ARM virtualization support of base-hw. User components that have access to the guest state accumulate their injection requests in a state object. The kernel - as soon as the guest gets scheduled again - flushes and executes these requests before switching to the non-secure world. The Linux TZIC driver, on the other hand, was slightly modified to provide a method that is used by drivers to acknowledge such injections by, again, using the SWINT register. The sequence diagram in image 2 depicts the process of communicating a device event from the secure world to the VM by using IRQ injection.
|
|
Signalling of secure device events to the guest OS via IRQ injection
|
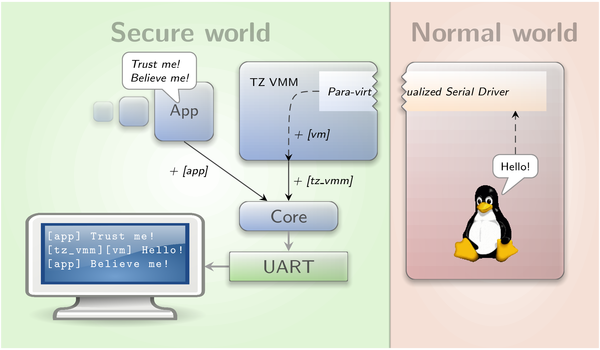
More complicated is the installation of a shared buffer. For this, the physical address of the buffer is determined and communicated to the monitor via SMC without much trouble. But, as the caches of secure and non-secure world do not interact, the memory region for the buffer must not be cached. It was not as easy as anticipated, to allocate non-cached memory inside the Linux kernel. The only way we found is DMA memory allocation. For doing so, Linux requires a device object, which did not exist for our virtual device. To get out of this situation, we had a deeper look at the DMA memory allocation code. We determined what is needed in a device structure to make simple DMA allocations with no device specific requirements. With this knowledge, we created a dummy device object and successfully obtained a non-cached RAM region. The sequence diagram in image 3 illustrates how a shared buffer is initialized and then used for bidirectional communication.

|
|
Transfer of big data chunks between guest OS and VMM through a shared RAM buffer
|
Having the communication channels in place, it was not a big deal to implement the remainder of the para-virtualized block driver as the code concerned with the cross-world exchange was in principal the same as the para-virtualized block driver in our existing L4Linux scenarios. Even the Linux-sided code worked without greater modifications, despite the big kernel-version jump.
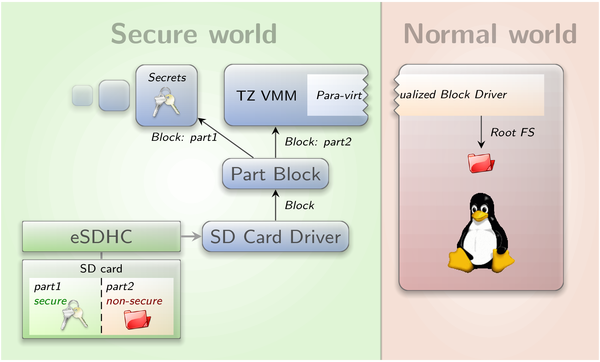
Our happiness about the fast forthcoming with the block driver was soon marred. Linux indeed started accessing the root file system on the untrusted SD partition and the data received was indeed correct. Unfortunately, the system got sporadically stuck without any hint on where the problem laid. With small file systems containing only Busy Box, the initialization sometimes unreliably finished. Our first idea was that there could be a race in the para-virtualized driver but neither increasing the synchronization nor heavy manipulation of the timing changed the behaviour in any significant way. So we tried locating the problem in a more systematic fashion. First, we did not know which world got stuck. Additionally, since the UART still was shared between the two worlds, we could not rely on serial output. Thus, the on-board LED was our next goal. We removed the LED heartbeat module from the USB Armory's Linux kernel to avoid interferences and modified Genode to toggle the LED state on each world transition. Unfortunately, the result was not clear as the LED continued switching on and off even after the UART stopped working. This motivated us to resolve the concurrent UART access. When we test-wise skipped all serial output in Linux, the Genode output became more reasonable and indicated an error in the eSDHC driver instead of suddenly breaking off. Now it was clear that it is a bad idea to concurrently access the UART from both TrustZone worlds. As a solution, we implemented a para-virtualized serial driver for Linux. It uses only one SMC call that sends a character to the monitor. The TZ-VMM buffers these characters and prints them as soon as a line end is reached or on buffer exhaustions. Each line of guest output is additionally prefixed to be distinguishable from the ordinary Genode log. The para-virtualized serial driver was then integrated into the higher level console as well as in the early printk console of Linux. Image 4 shows the flow of serial output from a secure component and the guest OS to the secure UART device.
|
|
Multiplexing and prefixing of log output from both worlds via a para-virtualized serial driver
|
Having fixed the serial output, we observed that our eSDHC driver reliably crashed after a multi-block write. We knew from our past experience that there were some issues with the completion of multi-block writes at the eSDHC. The controller already required a specially configured stop-transmission command to terminate such transfers. According to our reference manuals, this should have been sufficient. Nonetheless, subsequent commands failed as if the controller got out of sync. One suspicion we had was that Linux might change the GPIO or clock controls during bootstrap because it still had access to them. Therefore, we inspected all concerned registers at initialization time and directly before an error but the values looked just fine. The next idea was to move to the i.MX53 Quickstart Board (QSB) to see if the problem also occurred with other implementations of the SoC. Besides, this also simplified debugging as, in contrast to the USB Armory, the QSB is bootable via network. Fortunately, the eSDHC error was the same.
A big problem in this situation was that we always had to ask Linux to trigger the error with its initialization for us. As this process was pretty complex and contained many parallel tasks, reproducing the error was somewhat a game of chance. Unfortunately, Genode tests, like blk_cli, did not trigger the bug even when emulating the TrustZone system behaviour by generating CPU load in other processes. Thus, we came up with the plan to record block requests of the Linux boot procedure and replay them in the original order directly on Genode. The replay was performed by the eSDHC driver itself. Unexpectedly, however, all requests were successful when replayed. So we did go a step further and also recorded the timing intervals between Linux requests. And indeed, by adding this timing information to the replay, we had created a minimalistic and reliable error show case without all the TrustZone related surroundings.
From the eSDHC errata combined with the newer Linux sources, we now gathered further ideas of what could cause our problem. By examining a fresh eSDHC-IO trace of the 4.2 kernel, we saw that native Linux does not trigger comparable errors. So, investigating merely error robustness seemed to be the wrong direction. We observed that Linux does several things that are not required by the SD specification like writing the DSADDR register for each request or setting some diagnostic bits, but none of these worked for us. Anyway, our effort eventually produced some results. For example, Linux never uses the maximum request size per ADMA descriptor. This made us aware of a bug in the eSDHC when using size 0, which should stand for the maximum size according to the SD specification. Another delicious bug we found during this time and that fortunately had not caused troubles yet, was a missing memory barrier after setting up ADMA descriptors. Without this, the CPU may re-order ADMA2 descriptor writes in a way that breaks the following SD command. At some point in time, we started comparing the sequence of SD commands in Linux and in our driver and saw that the recent Linux issues a so-called SEND-STATUS command after each multi-block write. This was new to us and after looking deeper into the responsible code, we realized that Linux uses this command to synchronize the internal state of the SD card. Apparently, the eSDHC occasionally signals the transfer completion to early which, of course, means trouble for successive commands. And indeed, after also synchronizing our driver to the card's internal state, broken multi-block writes were no longer occurring. Image 5 gives an overview of the resulting system that is responsible for assigning one SD card partition (part2) to the normal world.
|
|
Applying TrustZone policies to external storage by using partitions (part1, part2) and a para-virtualized block driver
|
Usability improvement
With the SD-card-related problems resolved, we went cleaning up the code from all the unsuccessful solution attempts. Then, most of the modifications in the Linux code were replaced by modifications in the platform specific configuration and device tree so the build system can consider their side effects. Finally, we spent some time on building a reproducible demo scenario. First, we adapted the tz_vmm run script and server to suit both the USB Armory that uses a recent mainline Linux with DTB and a root file system via para-virtualizated eSDHC as well as the Quickstart Board that is driven with an old Freescale vendor Linux with ATAGs and initrd. To ease reproducibility, we made a pre-built Linux image, DTB, and root file system available online. By default, the run script automatically downloads and uses these images. We furthermore added a tutorial to the run script on how to create a bootable SD card with our demo. To simplify this tutorial even further, support for USB Armory was added to our create_uboot tool. This way, the the boot loader can be created via one comfortable command requiring only the target platform as argument. Last but not least, for those who are interested in modifying the guest OS, we provide our customized Linux sources and a detailed tutorial on how to create the three pre-built images mentioned above. The use of these tools is described in the next section.
The result
The current state of the tz_vmm scenario provides the following features:
-
A fully-featured USB-Armory Linux as TrustZone-encapsulated guest OS requiring only slight source-code modifications,
-
A light-weight Genode system as TrustZone monitor,
-
Protection of the eSDHC and UART against direct access by the guest OS,
-
Selective export of SD-card partitions into the guest OS using a para-virtualized block driver while the other partitions remain trusted,
-
A para-virtualized serial driver in the guest OS to capture its log output and distinguishably incorporate it into the UART output of the monitor,
-
Managing the on-board LED from within the monitor in order to signal trusted/untrusted code execution,
-
Bringing the scenario to your own USB Armory by using a fully documented and widely automated reproducible process.
There are still open issues that can be taken as motivation for further development:
-
The GPIO and clock controls are accessible by both the monitor and the guest. The guest OS cooperates by making no changes to the settings that would affect the monitors functionality. As a solution to this, guest access to the GPIO control should be para-virtualized. Please note, that one aspect of this is that the on-board LED is currently not trusted. Another consequence is the current lack of power management as the guest does not disable clocks in favour of Genode, and Genode, on the other hand, has no power management support yet.
-
The Genode driver for the USB-Armory eSDHC currently does not aim for maximum performance. The bus width and frequency are set statically to low values, aiming for broad support rather than getting the best out of each SD card.
-
The on-board LED is currently switched on and off by the so-called TZ-VMM, a user-land component of the Genode system. For a more comprehensive indication of trusted execution, it would have to be controlled from within the Genode kernel.
You can build the demo using Genode 15.11 by executing the following commands.
-
Obtain Genode and checkout the release tag for 15.11. The local branch will be called usb_armory:
 git clone https://github.com/genodelabs/genode.git
 cd genode
 git checkout -b usb_armory 15.11
-
Create build directory for the USB Armory board:
./tool/create_builddir hw_usb_armory
-
Build the example scenario:
 cd build/hw_usb_armory
 make run/tz_vmm
A tutorial on how to create a bootable SD card can be found in the corresponding run script os/tz_vmm.run. The login and password of the Linux guest are both "usbarmory". A tutorial on how to reproduce the pre-built Linux image, root file system and DTB - used by the run script - can be found at https://genode.org/files/release-15.11/usb_armory_tz_vmm/README.