
Sculpt for Early Adopters (EA)
Introduction
Sculpt is a component-based desktop operating system that puts the user in the position of full control. It is empowered by the Genode OS Framework, which provides a comprehensive set of building blocks, out of which custom system scenarios can be created. The name Sculpt hints at the underlying idea of crafting, molding, and tweaking the system interactively. Starting from a fairly minimalistic and generic base system, this tour through the Sculpt system will cover the following topics:
-
A boot image that is a live system, rescue system, and bootstrap system all in one,
-
Ways to tweak and introspect the system,
-
Formatting a SATA disk and storing files on the file system,
-
Connecting to a wireless network and downloading content from the internet,
-
Installation of additional software,
-
Deployment of the installed software, and
-
Running a guest operating system inside a virtual machine.
Feedback and contact
Your feedback is appreciated!
- Join the Genode mailing list for discussion
- Get in touch with the developers at GitHub
- Contact Genode Labs for commercial inquiries
A printable PDF version of this document is available at https://genode.org/documentation/sculpt-ea.pdf.
Prerequisites
Sculpt for Early Adopters (EA) is the first of a series of revisions with a successively increased ease of use, which is actually just a subtle way of admitting that it is currently rather difficult to use.
Sculpt EA expects that you already know your way around Genode's source tree and tool chain. Should this not be the case, please consider the "Getting started" section of the Genode Foundations book that is available as a free download at https://genode.org.
Vim skills required
Sculpt EA leverages (a subset of) GNU coreutils, bash, and Vim as the user interface for sculpting the system. If you are not yet familiar with using Vim, you may take Sculpt EA as a welcome chance to get your toes wet. To enjoy the experience, you should be comfortable with the following operations:
-
Opening and navigating within a text file (moving the cursor, using / to search),
-
Using the insert mode to make modifications,
-
Reverting accidental modifications (u undo),
-
Saving a modified file (:w),
-
Opening a file in a secondary buffer (:e),
-
Switching between buffers (:bn for next, :bp for previous),
-
Copy and paste (v start selection, V start line selection, y remember selection, p paste remembered selection),
-
Exiting Vim (:x save and exit, :q! discard changes).
Hardware requirements and preparations
Sculpt EA should be compatible with recent Intel-based PC hardware featuring Intel graphics, E1000 networking, Intel wireless, and AHCI.
It is tested best on laptops of the Lenovo X and T series (X220, X250, X260, T430, T460). For experimenting with Sculpt, we recommend getting a refurbished version of one of these. You may also find the unofficial hardware compatibility list http://usr.sysret.de/jws/genode/hcl.html helpful for finding Genode-compatible hardware.
The machine is expected to have a single SATA disk drive attached to an AHCI controller. NVMe is not supported. The content of the disk will be wiped in the process of following this guide. Sculpt has been tested with screen resolutions up to 2560 x 1440. Displays with a higher resolution are not expected to work. The sweet spot is a full-HD display.
Please revisit the BIOS settings of your machine in the following respects:
- VT-d enabled
-
Even though Sculpt is able to run without an IOMMU, we advise to enable this option for the sandboxing of device drivers.
- VT-x enabled
-
Hardware-assisted virtualization is needed to run VirtualBox on top of Sculpt.
- Boot from USB enabled
-
Sculpt is booted from a USB stick.
- Legacy boot enabled (recommended)
-
Needed to boot from USB in legacy BIOS mode, which is the default when building the Sculpt boot image.
- Optimize for performance when battery powered
-
If the latter is not set, the hardware may behave erratically (e.g., non-working trackpoint when on battery).
Building the boot image
The following steps assume that you have the Genode tool chain installed on a GNU/Linux system. For reference, Ubuntu 16.04 is known to work well.
-
Clone Genode's Git repository:
 git clone https://github.com/genodelabs/genode.git
 cd genode
 git checkout 18.02
-
Download the support for the NOVA microkernel
./tool/depot/download genodelabs/bin/x86_64/base-nova/2018-02-26
The content is downloaded to the public/ directory and extracted to the depot/ directory.
-
Download all ingredients for the Sculpt boot image
./tool/depot/download genodelabs/pkg/x86_64/sculpt/2018-02-27
-
Create a build directory
./tool/create_builddir x86_64
-
Configure the build directory by editing build/x86_64/etc/build.conf. Most importantly, enable the gems source-code repository where the sculpt scenario resides. In addition the ports, dde_linux and dde_ipxe repository are needed as well.
-
Create the sculpt boot image (defined by the run script at repos/gems/run/sculpt.run)
make -C build/x86_64 run/sculpt KERNEL=nova
The boot image is created at build/x86_64/var/run/sculpt.iso.
-
Write the boot image to a USB stick:
sudo dd if=build/x86_64/var/run/sculpt.iso of=/dev/sdx bs=1M conv=fsync
Here, /dev/sdx refers to the device node of your USB stick. To determine it, you may inspect the output of dmesg after plugging it in.
Base system
Unless customized, the sculpt base system resides as a self-contained live operating system on a USB stick, not installed on disk. This has two advantages. First, it makes the update of the base system straight-forward and completely risk-free. Simply install the new version on a second USB stick. Should the new version cause any trouble, one can fall back to the original one by swapping the USB sticks. Second, it alleviates the need to install any boot-loader infrastructure on disk. In fact, we will not create a partition table and use the entire disk as one file system.
Note that Genode is not limited to booting from USB. It also supports the use of partitions. But for this guide, we keep things as simple as possible.
System overview
|
|
System overview
|
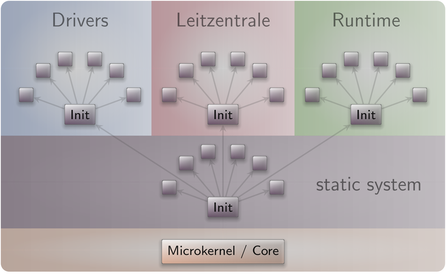
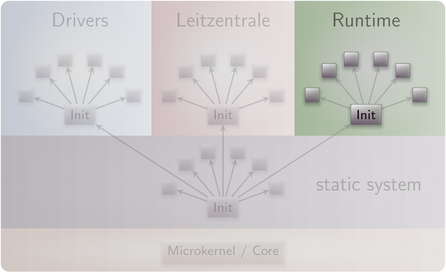
The sculpt system consists of four parts living on top of the microkernel (Figure 1).
Static system
The first - static - part of the system is baked-in the boot image. It contains components that must be shared by the upper - dynamic - parts and defines the relationships between the upper parts via a static policy that is fixed by the creator of the boot image.
|
|
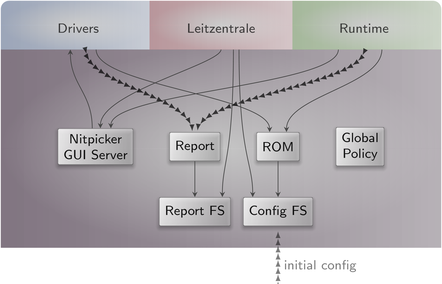
Detailed look at the static part of the system
|
Besides a low-complexity GUI multiplexer called Nitpicker, the static system contains two in-memory file systems. The config file system stores configuration data whereas the report file system stores information reported by components. These file systems are invisible to regular components. Components obtain their configuration data from a (read-only memory) ROM service, and report their state to a (write-only) report service.
At boot time, the config file system is pre-populated with information from the boot image. It stays in memory. Hence, after rebooting the system, any changes are gone.
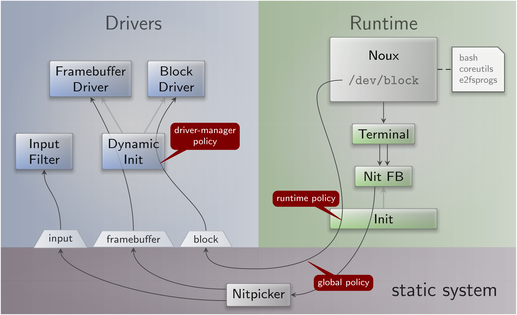
Drivers subsystem
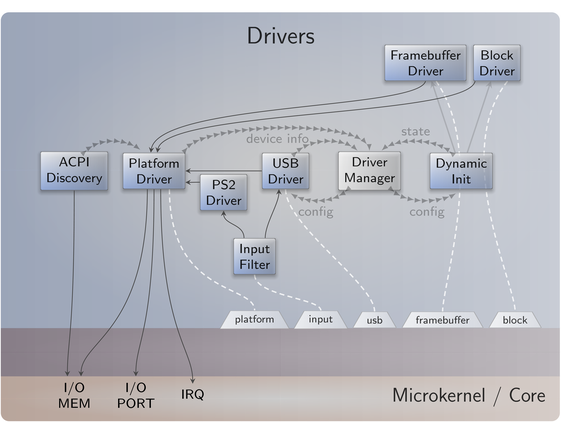
The drivers subsystem provides all the basic services needed to realize an interactive system scenario: a framebuffer service for the graphical output, an input service to obtain user input, and a block service to access a storage device. All other drivers like networking or audio drivers are not covered by the drivers subsystem. They will enter the picture at a later stage and will use the platform service and USB service to access device resources.
|
|
Services provided by the drivers subsystem
|
As illustrated by Figure 3, some drivers like the framebuffer driver live in a dynamically managed subsystem that depends on runtime discovery of the hardware by the so-called driver-manager component. Whenever an Intel graphics device is present, the Intel framebuffer driver is spawned. Otherwise, a generic VESA driver or a driver for a boot-time-initialized framebuffer is used.
Several components of the drivers subsystem report their state. E.g., when the Intel framebuffer is used, it reports the list of connectors present. Most importantly, the driver manager reports the available block devices.
As user input may enter the system in multiple ways - most prominently PS/2 and USB HID - the drivers subsystem contains a so-called input-filter component that merges these event streams and applies transformations like key remappings or mouse acceleration.
Leitzentrale subsystem
The Leitzentrale gives you - the user - full control over the config file system and the report file system. You are free to inspect and manipulate the system in any way you wish. The German term Leitzentrale refers to a control center that requires a certain degree of sophistication from the operator, which would be you. A typo at the wrong place may render your system temporarily inaccessible, eventually requiring a reboot. But don't be afraid. Since all manual changes performed in the Leitzentrale occur in memory only, you are not at risk of permanently bricking your machine.
|
|
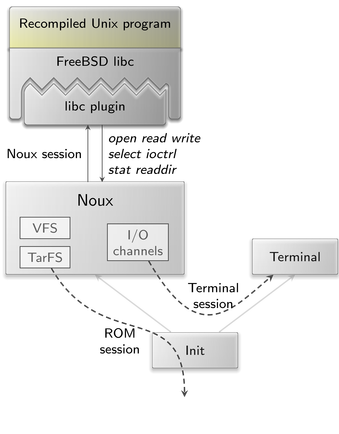
Noux runtime environment for executing Unix tools
|
The Leitzentrale can be toggled at any time by pressing F12 and will be enabled right after boot. It uses a small Unix runtime called noux (Figure 4) as user interface. Don't let the presence of a Unix shell mislead you. Sculpt is not a Unix system. It merely uses Unix subsystems in the form of noux instances as convenient tools for managing and editing files.

|
|
Leitzentrale subsystem
|
The Leitzentrale employs two noux instances (Figure 5). With the instance on the left, you can interact with both the report and config file systems using familiar commands such as the bash shell, a subset of coreutils, and Vim. The right side gives you a quick glance at the current log messages. The log is also available at report/log and can be browsed with Vim.
Noux is not bullet-proof. Should you get stuck, you may re-spawn it at any time by pressing F11.
Tweaking and inspecting the system
The Leitzentrale subsystem empowers you to interactively inspect and tweak the running system. Let's take a walk next.
Adjusting the user-input handling
By default, Sculpt uses the US-English keyboard layout with a functioning capslock key. You may possibly want to adjust the former and - as a Vim user - most likely discharge the latter. As mentioned in Section Drivers subsystem, user input is processed by the input-filter component. You can edit this component's configuration via
genode:/> vim /config/input_filter.config
To change the keyboard layout to German, change "en_us.chargen" to "de.chargen" and save the file. The change becomes effective immediately at saving time.
Note that the terminal does not display umlaut characters. Please stick to using plain ASCII characters.
To remap the capslock key to escape - a key often needed while using Vim - uncomment the corresponding <remap> rule
<key name="KEY_CAPSLOCK" to="KEY_ESC"/>
After saving the file, a Vim user's life suddenly becomes much more pleasant.
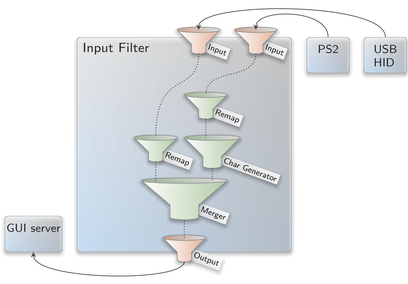
|
|
Filter chain for user-input events
|
Take the time to review the remaining parts of the input-filter configuration. The nested configuration nodes define a hierarchy of filters that are applied in the order from the inside to outside (Figure 6). There are filters for merging events (<merge>), remapping buttons and keys (<remap>), supplementing symbolic character information (<chargen>), pointer acceleration (<accelerate>), and emulating a scroll wheel by moving the pointer while pressing the middle mouse button (<button-scroll>).
Display settings
If you are running the Intel graphics driver, you can inspect the connected displays and their supported resolutions by taking a look at the report at /report/drivers/dynamic/intel_fb_drv/connectors. This report is updated whenever a display is connected or disconnected. You can use this information to enable or disable a display in the driver's configuration, which you can find at /config/fb_drv.config. Please don't forget to correctly specify all attributes including the hz attribute. Otherwise, the driver will not consider the <connector> setting.
For a quick test, change the attribute height="768" to force_height="768" (you may modify width analogously). When saving the file, the screen real-estate will forcibly be limited to the specified size. This is helpful during presentations where the beamer has a lower resolution than the laptop's internal display. By specifying the beamer's resolution, both the laptop and the beamer show the same content.
Exploring the drivers and Leitzentrale subsystems
You can review the construction plan of the drivers subsystem by opening the file /config/drivers/config in Vim. In particular, it is interesting to follow the <route> rules to see how the various components are connected. But there is more. The configuration is live. It enables you to reconfigure individual components on-the-fly. For example, search for the <start> node of the PS/2 driver and add the attribute verbose_keyboard="yes" to the embedded <config> node. By saving the file, the changed configuration becomes effective. Any key pressed or released on the PS/2 keyboard will result in a log message on the right. You may revert this change (vim: u) and save the original version of the file.
Note that not all components are dynamically reconfigurable but many modern ones - in particular the init component and most long-running server components - are.
It is possible to forcibly restart a component by adding a 'version' attribute to the <start> node. Whenever the version value is changed, the component is re-spawned.
The component-specific configuration options are documented in the README files accompanying the respective components in the source tree.
Analogously to the drivers subsystem, you can find the construction plan for the Leitzentrale subsystem at /config/leitzentrale/config. Try out the following tweaks:
-
Change the transparency of the two noux instances by modifying the alpha attributes of the control_fader and log_fader components.
-
Change the position and size of the two noux instances by tweaking the coordinates (xpos, ypos, width, height) of the control_nit_fb and log_nit_fb components.
-
Show a simple CPU-load display by uncommenting the <start> node of the cpu_load_display component.
-
Change the font size of the control_terminal component from "16" to "12".
You may also enjoy tinkering with the configuration of the nitpicker GUI server, which is located at /config/nitpicker.config. For example, you may change the background color or the labeling color of the "default" domain.
Storage, networking
|
So far, we have not lost any word about the third subsystem called "runtime" that lives besides the drivers and Leitzentrale subsystems. The runtime subsystem has no predefined purpose but can be filled with life as you wish. In the following, we successively reshape the content of the runtime subsystem to perform a form of system installation.
Analogously to the drivers subsystem, the live configuration of the runtime subsystem is located at /config/runtime/config. Initially, it is almost empty.
Preparing the disk
It goes without saying that we want to persistently store data, programs, and configuration information on our machine. So we need to access a block device. Let us see if the drivers subsystem has successfully detected the SATA disk of your machine:
genode:/> cat /report/drivers/block_devices
The report should contain one <device>. The label attribute denotes the physical name, under which the drivers subsystem will hand out a block session for this device (e.g., ahci-1). If there is only one device, the <block_devices> report features a default attribute, which should correspond to the label of the <device>. Regardless of its label, this block device is handed out as block session under the label default. This relieves the runtime subsystem from dealing with the physical label of the device. If more than one devices are present, there is no default device. For this guide, we assume that a default block device is present.
|
|
Runtime for accessing a block device
|
To format the default block device, there exists a template runtime configuration at /config/runtime/block.config. Take a moment to review it (Figure 8). The interesting part is a noux instance that has a block session mounted at /dev/block and a few tar archives containing bash, coreutils, Vim, and e2fsprogs mounted at /. Here we have a special-tailored Unix enviroment with the sole purpose of formatting the disk. To bring this runtime to life, simply overwrite the live configuration with the template:
genode:/> cp /config/runtime/block.config /config/runtime/config
After issuing this copy operation, the new noux instance becomes visible in the background of the Leitzentrale. Hide the Leitzentrale by pressing F12 to interact with noux. You need to click on noux to set the input focus. Within noux, you can issue the following command to format your default block device with an ext2 file system. Note that this command wipes the original content from your block device:
block:/> mkfs.ext2 /dev/block
After a few seconds, your disk should be ready to use. The block runtime is also useful to check the consistency of your file system:
block:/> fsck.ext2 -pv /dev/block
File-system access
|
|
Runtime for accessing a file system
|
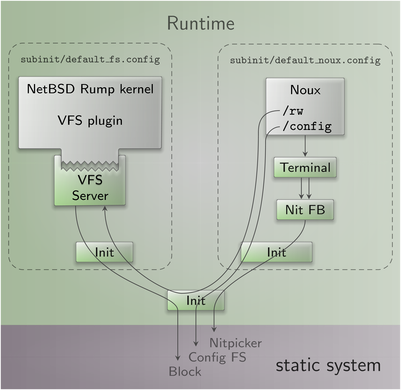
With the default block device formatted, we can in principle store data as files and directories. All we need is a file-system component that translates the notion of files and directories to block-device accesses. To fill this gap, we use a NetBSD rump kernel. More specifically, we mount a rump kernel as a plugin into a dedicated VFS server component (Figure 9.
As we will need the same construct in several runtime configurations, it is convenient to wrap it inside a dedicated init instance, which can be instantiated as a child within the runtime configuration. The configuration for this sub init is located at /config/subinit/default_fs.config. It nicely hides the technicalities of how the default file system is accessed and is the natural hook for using more advanced disk layouts (as indicated by the commented-out parts).
Following the same line of thoughts, there also is a building block for an often used noux configuration at /config/subinit/default_noux.config. This noux instance has both the on-disk file system and the in-memory config file system mounted.
The runtime-configuration template /config/runtime/fs.config combines both building blocks. Activate it via the Leitzentrale:
genode:> cp /config/runtime/fs.config /config/runtime/config
The previous (block) noux instance is replaced by a new one, which allows you to interact with the on-disk file system mounted at /rw/. At this point, you can copy data back and forth between the in-memory config file system and the on-disk file system.
Making customizations permanent
Using the /config/runtime/fs.config runtime template, you can easily backup your customizations of the config file system to disk. By convention, we create a directory /rw/config/ on the default file system:
noux:> mkdir /rw/config

|
|
Saving customizations
|
We can now selectively copy modified configurations from the config file system to this location, e.g.:
noux:> cp /config/input_filter.config /rw/config/
Restoring customizations after boot
After rebooting the system, the saved customizations won't take any immediate effect because the boot image does not touch the default file system. However, there is a convenient template for a runtime configuration that copies configuration data from the default file system to the in- memory config file system.
As you may have guessed: /config/runtime/load.config utilizes a dedicated noux instance for this job. This noux instance starts the bash shell with the --login argument, which prompts bash to execute the commands provided by the .bash_profile file. These commands perform the actual copy operations.

|
|
Restoring customizations
|
In the daily routine of using Sculpt, issuing the following command in the Leitzentrale right after system boot does the trick:
genode:/> cp /config/runtime/load.config /config/runtime/config
To give this a try, you may reboot your machine by editing /config/system. Set the attribute state to the value "reset" and save the file.
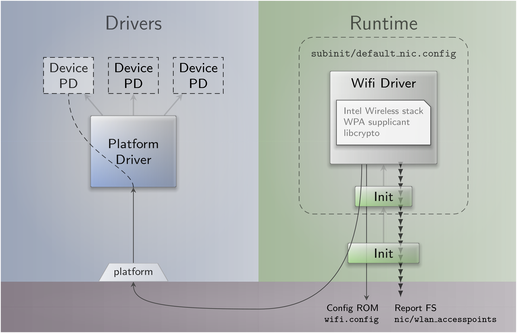
Connecting to a wireless network
The drivers subsystem does not contain any support for networking. However, the boot image provides all the building blocks needed to establish network connectivity at the level of the runtime subsystem. Those building blocks are drivers for wired and wireless network devices, a component for routing network traffic, a TCP/IP stack, and an application for downloading content.
Following the pattern used for the default file system where the technical details are nicely wrapped in the default-fs building block, there exists the sub-init configuration /config/subinit/default_nic.config. By default, it contains the wireless driver, which is a port of the Intel wireless stack from the Linux kernel and the accompanying WPA supplicant.
|
|
Hosting a wireless driver within the runtime subsystem
|
When started, the driver requests a session to the platform driver of the drivers subsystem. Through this session, the driver becomes able to interact with the networking device. All other devices remain hidden from the driver. The driver continuously scans for wireless access points at a fixed interval and reports the results in the form of a wlan_accesspoints report. Furthermore, it requests the ROM module wlan.config, which contains the authentication information needed to connect to a selected access point (Figure 12). To give the driver a spin, you may use the /config/runtime/download.config runtime template:
genode:/> cp /config/runtime/download.config /config/runtime/config
Depending on the platform, the driver may spill the log with a lot of frightening messages. Don't let them intimidate you. Better look for the interesting information:
genode:/> vim /report/runtime/nic/nic/wlan_accesspoints
You should see a list of access points including their SSIDs and signal qualities. To establish a connection to one of the access points, open the file /config/wlan.config (vim: :e /config/wlan.config). By opening the wlan.config file in a separate buffer, you may conveniently copy the SSID from the wlan_accesspoints report. Don't forget to specify your WPA2 password as psk (pre-shared key) attribute value. After writing the file, the driver should become active as indicated by an influx of new log messages. To check for the connection state, take a look at the corresponding report:
genode:/> cat /report/runtime/nic/nic/wlan_state
If everything went well, it should tell you state="connected".
Alternatively to using the wireless driver, you may use a wired networking driver. A snippet for a corresponding start node is provided in the default_nic.config file. Comment out the wireless driver and uncomment the wired driver.
Note that the successive starting, killing, and restarting of the drivers does not work reliably on all platforms. Sometimes the device ends up in an inconsistent state, unable to establish a network connection. If this happens, you'll have to reboot your machine to properly reset the device.
By default, the 11N mode of the wireless driver is disabled because the wireless hardware of a few modern platforms behave unreliably otherwise. You may try to set the use_11n attribute in the default_nic.config to "yes" to improve the networking throughput.
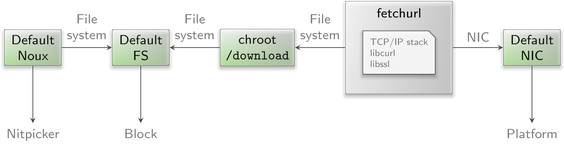
Downloading files
With both network connectivity and persistent storage, it is time to download content from the internet. If you followed the steps above, the download runtime /config/runtime/download.config should already be in place.
|
|
Runtime for downloading content from the network
|
Figure 13 illustrates the scenario that builds upon the default_noux, default_fs, and default_nic building blocks. The fetchurl component should raise our concern. It has access to the file system and is at the same time exposed to the network. A remote attacker may exploit it as a gateway to our persistent storage. What makes matters worse is the enormous complexity of the component, which includes protocol implementations for TCP/IP and HTTPS (via libcurl). Vulnerabilities should be expected. For this reason, the scenario shields the real file system from fetchurl by using a chroot component, which presents the local download directory as the file system to fetchurl. In the worst case - if fetchurl falls completely into the hands of an attacker - the reach of the attack is limited to the download directory.
In the /config/runtime/download.config template that we installed in the runtime subsystem, fetchurl is commented out. Take a minute to study the configuration of the chroot and fetchurl components. These components are readily configured to download the ISO image of the Debian installer to the location /vm/debian/installer.iso. We will use this ISO image in the subsequent steps.
Let's start downloading the file by uncommenting the fetchurl start node in the runtime configuration /config/runtime/config directly and saving the file. The download of the circa 300 MiB may take a while. You may inspect the progress by using the accompanied noux instance.
noux:/> ls -l /rw/vm/debian/
Extending the system
The base system discussed so far is just an intermediate step towards a real operating system. It contains only the components necessary to reach the second stage where software is hosted on the file system. In contrast to the base system, which is meant to stay constant over a long time or even used as firmware instead of a BIOS, the second stage is designed to be expandable in arbitrary ways. The software of the second stage comes in the form of packages facilitating a custom package-management concept that is inspired by Git as well as the Nix package manager.
- Non-destructive
-
Installing or updating software has no effect on the already installed software. You can always roll back your system to a previous state. There are no install script that could mutate the system globally.
- Multiple versions can peacefully co-exist
-
Updating one package does not force you to update other, unrelated, packages.
- Simplicity
-
There is no domain-specific language and no database. All meta data is in plain sight.
- Decentralized software provisioning
-
There can be any number of software providers. The potential reach of each software provider is limited to one directory each. One can even install software from an untrusted party without any fear.
- Accountability
-
Software cannot enter the system without a proper OpenPGP signature that attests its authenticity and integrity.
- Low-complexity trusted computing base
-
The installation mechanism sandboxes all components that are potentially exposed to an attacker, e.g., the code that decompresses and extracts archives, or any network-facing code.
Installing software
To install software, we need the following prerequisites:
-
Storage location for downloads,
-
Storage location for installed software,
-
Download URL, and
-
Public key of software producer.
By convention, software is downloaded to the /public directory of the default file system whereas installed software will reside in the /depot directory. The latter also hosts the information about download URLs and public keys. To prepare the depot, we can use a default_noux instance as featured in the fs or download runtime templates.
-
Create the download location
noux:/> mkdir /rw/public
-
Initialize the depot for hosting the installed software. The example provided at /config/examples/depot/ is equipped with the public key and the download URL for packages originating from Genode Labs.
noux:/> cp -r /config/examples/depot /rw/
|
|
Runtime for installing / updating software
|
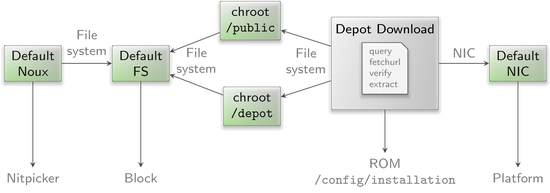
With these preparations in place, the /config/runtime/update.config runtime template can be used to install software (Figure 14). Following the pattern used by the download runtime, the access to the file system is mediated via chroot components. The software to install is defined by /config/installation, which contains a list of archives. By default, it contains a meta package called "sculpt-installation", which contains all components needed to host a virtual machine on top of Sculpt. To trigger the installation:
genode:/> cp /config/runtime/update.config /config/runtime/config
|
|
System installation as an iterative procedure
|
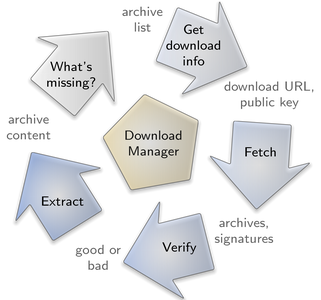
The update runtime contains a so-called depot-download subsystem that orchestrates the dependency tracking, downloading, verification, and extraction of depot content. Internally, the depot-download subsystem is composed of several components that are dynamically spawned and disposed as needed. As illustrated by Figure 15, the installation is an iterative process, which will eventually finish with the log message "Installation complete".
Deploying installed software
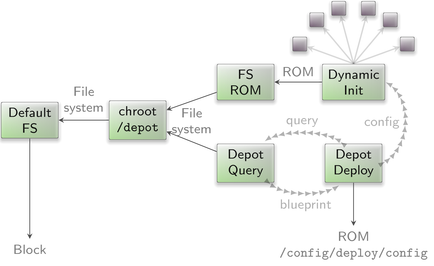
Once the local depot is populated with installed software, we need to steer Sculpt to use the new installed components instead of the ones found on the base image. This is accomplished with the /config/runtime/deploy.config runtime template as illustrated in Figure 16.
|
|
Runtime for deploying installed software
|
The deploy runtime spawns a dynamically configured init as a subsystem. Like any init instance, it obtains the binaries for the hosted components as ROM modules from a ROM service. But unlike the instances we encountered so far, which obtained ROM modules from the ROM service of the base system, this init instance is directed to a FS-ROM component that fetches ROM-module content from the depot.
The last missing piece of the puzzle is a component that configures the dynamic init instance while supplementing the information of where to look inside the depot for the required ROM modules. This is the role of the depot-deploy component. It takes a high-level description of the to-be-deployed system scenario in the form of the /config/deploy/config ROM module, queries the depot for the details and ingredients of the scenario, and generates the configuration for the dynamic init instance. Like init, the depot-deploy component is able to dynamically respond to updates of the /config/deploy/config ROM. This enables you to dynamically shape the deployed scenario. The configuration looks similar to init's configuration but at higher level of abstraction. In particular, start nodes refer to so-called runtime packages, which are provided by the depot and nicely wrap all the low-level details into easy-to-use building blocks.
For example, the "pkg/noux-system" package as featured in /config/deploy/config is a noux subsystem similar to the default_noux subinit. When activating the depot runtime template, the noux instance appears. This time, however, the noux subsystem is created out of the installed depot content:
genode:/> cp /config/runtime/deploy.config /config/runtime/config
Hosting a guest operating system
The default scenario found at /config/deploy/config contains all the pieces needed to host a virtual machine on top of Sculpt. A virtual machine is a convenient stop-gap solution for running programs that are not yet available natively on Genode. It ultimately enables us to use Sculpt as day-to-day OS today.
By convention, we host the content of each virtual machine in a dedicated directory /vm/<guest-os>/ at the default file system. In Section Downloading files, we already downloaded the ISO image with the installer for the Debian operating system. To run it within a virtual machine, we additionally need a virtual disk image (machine.vdi) where to install the guest OS to, and a VirtualBox configuration file (machine.vbox). You may take the files provided at /config/examples/vm/debian/ as starting point, using the noux-system instance that is already running after activating the deploy runtime.
noux:/> cp /config/examples/vm/debian/* /rw/vm/debian/
Please review and adjust the machine.vbox file as needed, in particular you may reconsider the amount of RAM by changing the RAMSize attribute. To start the virtual machine, uncomment the following commented-out parts of /config/deploy/config:
-
One of the two NIC drivers (either wifi or ipxe_nic_drv),
-
The NIC router, which sits in-between the NIC driver and the virtual machine, and plays the role of a virtual NAT router, and
-
The start nodes of "vm_fs", "shared_fs", "usb_devices_rom", and "vm".
After saving the file, VirtualBox should appear, starting the Debian installer.
After the installation is finished and the guest system was rebooted, it is time to install the guest additions of VirtualBox. To do that, the apt(1) configuration has to be adjusted. Edit the file
# vi /etc/apt/sources.list
and add the line
deb http://ftp.debian.org/debian stretch-backports main contrib non-free
Afterwards update the package cache
# apt update
and upgrade the packages
# apt upgrade
and install the Linux kernel headers
# apt install linux-headers-amd64
Just to be sure that the guest additions will use the newest kernel, reboot the guest system. Next, install all needed packages for the guest additions:
# apt install virtualbox-guest-dkms virtualbox-guest-x11
Having the Linux-header package is mandatory as the needed modules will not be built without it. After the packages are installed and the modules have been built, certain features like the dynamic mode-setting and shared folders can be used.
The example machine.vbox file already provides a configured shared folder called shared. By executing
# mount -t vboxsf shared /mnt/
it can be mounted and accessed via /mnt.
Advanced usage
Reproducing the system from source
Section Building the boot image presents the creation of the boot image from pre-built packages. You may want to build those packages from source, in particular for customizing the system.
Before building the packages, various ports of 3rd-party software need to be prepared. The following command prepares all of them at once:
 <genode-dir>/tool/ports/prepare_port \
      bash coreutils curl dde_ipxe dde_linux \
      dde_rump e2fsprogs gnupg grub2 jitterentropy \
      libarchive libc libgcrypt libiconv libssh \
      lwip ncurses nova openssl qemu-usb stdcxx \
      vim virtualbox5 x86emu xz zlib
The ingredients of the boot image are subsumed by the pkg/sculpt package. The default set of software installed by the update runtime is defined by the pkg/sculpt-installation package. You can find the depot recipes for these packages at repos/gems/recipes/pkg/.
The repos/gems/run/sculpt.run script can be executed to build a boot image. By default, the boot image refers to genodelabs/pkg/sculpt and to genodelabs/pkg/sculpt-installation for the runtime-installed software. You may want to install your version of these packages instead by changing the package provider from genodelabs to <you> by adding the line
RUN_OPT += --depot-user <you>
to your <build-dir>/etc/build.conf.
To build the packages for the boot image:
 <genode-dir>/tool/depot/create \
      UPDATE_VERSIONS=1 FORCE=1 REBUILD= \
      <you>/pkg/x86_64/sculpt \
      <you>/bin/x86_64/base-nova
The FORCE=1 argument ensures that source archives are re-created and checked for the consistency with their versions. If the source code of any of the archives changed, the UPDATE_VERSIONS=1 argument automatically updates its version. Please don't forget to commit the updated hash files. The empty REBUILD= argument limits the creation of binary packages to those that do not yet exist in binary form. If not specified, the command would recompile all packages each time. You may further add -j<N> to parallelize the build process where <N> is the level of parallelism.
Building the sculpt-installation package works analogously to the sculpt package.
 <genode-dir>/tool/depot/create \
      UPDATE_VERSIONS=1 FORCE=1 REBUILD= \
      <you>/pkg/x86_64/sculpt-installation
To make the sculpt-installation available for download from within the boot image, you must publish it. This involves the archiving, signing, and uploading of the content. The former two steps are covered by the tool/depot/publish tool, which expects one to specify a concrete version. The current version of the sculpt-installation can be obtained via
cat <genode-dir>/repos/gems/recipes/pkg/sculpt-installation/hash
The first part is the version. The second part is the content hash of the version. For more information about working with the depot tool, refer to http://genode.org/documentation/developer-resources/package_management.
UEFI boot
By default, the steps given in Section Building the boot image produce a legacy-boot ISO image, which requires a BIOS. To create an UEFI image instead, modify your <build-dir>/etc/build.conf by replacing image/iso by image/uefi. When executing the sculpt.run script now, an UEFI image is created at build/x86_64/var/run/sculpt.img. It is a disk image containing an UEFI partition with all the content needed. It can be directly written to a USB stick.
Updating the USB boot device from within VirtualBox
The /config/deploy/config scenario is prepared to assign USB storage devices directly to a running virtual machine. You may inspect the report /report/drivers/usb_active_config to get a list of attached USB devices. Use Vim to copy the <policy> node of the selected device into the <inline> section of the usb_devices_rom start node within your /config/deploy/config, and adjust the line as follows:
-
Replace the node type <policy> by <device>, and
-
Rename the attribute label_suffix to label.
The updated usb_devices ROM prompts VirtualBox to open a USB session at the drivers subsystem. Hence, when saving the modified /config/deploy/config file, the guest OS should detect a new USB device (check the output of dmesg). You may now write a new version of the Sculpt ISO image to the device by following the steps described in Section Building the boot image.
Credits
Sculpt is an example system scenario of the Genode project, which is an operating-system technology designed and developed from scratch.
- Genode OS Framework
That said, Genode is not developed in a vacuum. It rather stands on the shoulders of giants and greatly benefits from the free-software/open-source community. The following projects play a particularly important role for the Sculpt scenario.
- NOVA microhypervisor
-
Sculpt's kernel is a derivate of NOVA, maintained by Genode Labs. NOVA was originally created by Udo Steinberg http://hypervisor.org.
- Linux kernel
-
Sculpt reuses several Linux subsystems as individual components, in particular the USB stack, the Intel wireless stack, the Intel graphics driver, and the TCP/IP stack.
- NetBSD's rump kernel
-
https://wiki.netbsd.org/rumpkernel/
The file-system support is based on NetBSD kernel code, which became reusable on Genode thanks to the rump kernel project.
- FreeBSD
-
The C runtime that is used by most 3rd-part software is based on FreeBSD's libc.
Device drivers
- WPA supplicant
-
https://w1.fi/wpa_supplicant/ (used by the wireless driver)
- iPXE
-
http://ipxe.org (basis of the wired network driver)
- xf86emu
-
http://xorg.freedesktop.org/ (used by the VESA driver)
Programs and libraries used within the noux runtime
- Vim
- ncurses
- GNU coreutils
- GNU bash
- E2fsprogs
Libraries used for the package-management infrastructure
- curl
-
https://curl.haxx.se (basis of the fetchurl tool)
- libssh
- OpenSSL
- XZ Utils
-
https://tukaani.org/xz/ (support for tar.xz archives)
- libarchive
-
https://www.libarchive.org (basis of the extract tool)
- zlib
- GnuPG
-
https://www.gnupg.org (basis of the verify tool)
Applications
- VirtualBox
-
https://www.virtualbox.org (used for hosting virtual machines)
Crucial tools used during development
- GNU/Linux
-
(various distributions)
- Git
- GNU compiler collection
- GNU binutils
- GNU make
- Tcl
- Expect
- Qemu
- GitHub issues